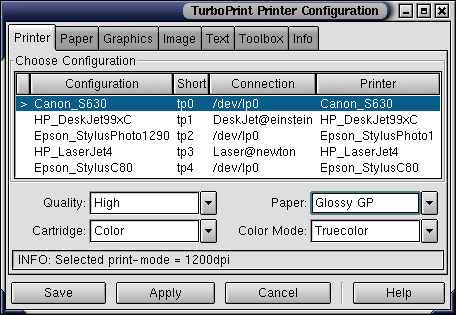
With the xtpconfig program you can select all the options you may want to change before printing a document. This includes settings like print quality, type of paper, etc.
Note:TurboPrint can be integrated in the two different printing systems LPR/LPRng and CUPS. Depending on which system is installed on your Linux OS xtpconfig offers different settings. In this chapter we assume that you are using the CUPS printing system. Should you have installed the LPR printer spooler system please read the preceding chapter.

The config menu has several menu pages each containing a group of settings that belong together.
Available pages are:
Select the configuration and set paper type, quality
Paper size, tray, multiple copies, zoom
Settings for brightness and color rendering
Size and position settings for image printing
maintenance utilities mainly for inkjet printers
In the bottom line there are four buttons that will be available from all menu pages:
Save the changed settings and leave the config menu
Save the changed settings but don't leave
Quit the config menu and forget all changes that have not yet been saved
Display some information about TurboPrint.
After starting the config menu the "Printer" page is shown. The first thing you have to do is to select the configuration for which you want to change the settings:
In the "Choose configuration" field there is a table shown which lists all available printer configurations that are currently installed. Select the desired configuration by clicking on its name. All settings that you change from now on will be changed in the selected configuration. The changes do not get into effect until you press either Save or Apply.
In the following you find the different menu pages and its settings:
A table is shown that lists all available printer configurations installed by TurboPrint (with xtpsetup).

Choose the appropriate configuration whose settings you want to change in the configuration list.
For each printer configuration, the following entries are displayed:
This is the configuration's name. A ">" is shown in the leftmost column if this configuration acts as the default printer.
A short name (alias) for the printer Configuration
The device that the printer is attached to (or the name of a remote printer).
The name of the printer model and the corresponding printer driver.
Note that there can be several configurations for the same printer. So you can e.g. have a configuration for printing images and one for printing office letters. Select the desired configuration by clicking on its name.
Below the configuration table you find four basic settings for your printer:
Almost every printer offers different print modes. Normally, the higher the print quality is the longer the printout will take. So you will probably choose a lower print quality for draft and test printouts and one of the highest qualities for the final printout.
Note: In TurboPrint FreeEdition, some print modes are marked with an arrow at the left. These work only in demo mode, i.e. that a TurboPrint logo is added in the upper right corner of the printout. To use TurboPrint as full version please purchase a license with a personal keyfile at www.turboprint.de.
Some ink jet printers have separate exchangeable ink cartridges for black or color printing. If this is the case with your printer you have to tell your printer driver which cartridge is currently installed (e.g. Black, Color, Photo) so that it can make use of the available colors.
Choose the kind of paper you want to print at. This is especially important for ink jet printers. Depending on the paper quality (e.g. normal paper, photo paper, glossy paper, etc.) the printer driver varies the amount of ink per area and uses special color correction modes. If you set the wrong type of paper you may get a bad print quality. Depending on the printer different choices are available.
Note: In TurboPrint FreeEdition, special papers are marked with an arrow at the left. These can only be used in demo mode, i.e. that a TurboPrint logo is added in the upper right corner of the printout. To use TurboPrint as full version please purchase a license with a personal keyfile at www.turboprint.de.
This setting defines how TurboPrint will adopt the colors for the printer.
Means that there are no colors at all. For postscript documents, shades of gray will be generated by ghostscript. If images are printed, any color that will be printed becomes either black or white depending on its brightness.
This mode is fast and recommended for printouts without color or gray shades (just black text, no images). It is the default for black & white printers.
256 Levels of gray - used for printing color images in black & white.
24bit color. This is the default setting for color printers.
8bit color (equals to 256 different colors) - less print quality but sometimes faster printouts than with "24bit". Use this for color text documents or clipart graphics with few colors, not for photorealistic images.
This field displays the currently selected print mode with additional information like dpi ("dots per inch") or special print modes.
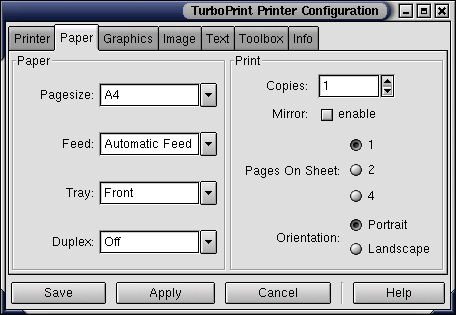
The paper size, e.g. Letter, A4, etc.
The input feed (e.g. manual or automatic).
The output tray (only for printers that support different output trays).
Only for printers that support duplex printing. Activate "Duplex" mode if you want the printer to use both paper sides.
If you want get several copies, enter the desired number of printouts ("1" means no copies).
The printout will be mirrored (left and right swapped). This setting is activated automatically for "backprint" and "t-shirt transfer" media.
With this function you can print several scaled down pages on one sheet of paper.
1: one page per sheet (default)
2: print two pages on one sheet; the printout is rotated by 90 degrees
4: print four pages on one sheet
Select the page orientation for application programs ("Portrait" or "Landscape").
The following settings contain adjustments for the reproduction of brightness and colour.
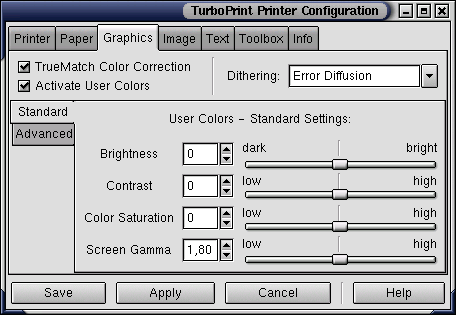
Switches the powerful TrueMatch colour correction on/off. This system developed for TurboPrint will allow you to accurately output to your printer what you see on the screen. Every single screen colour will be adjusted separately according to the used printer and kind of paper. TurboPrint comes with special colour correction tables for many kinds of paper and almost every printer on the market.
While your screen can display millions of colours, your printer normally only supports black or four (some printers even up to eight) different colours. It is therefore necessary to create intermediate colours or shades of grey either by mixing the ink colours and/or by applying certain dithering patterns to produce the illusion of more colours than the printer actually uses. To accurately represent the on-screen colours, TurboPrint supports two different dithering patterns:
This diffuse pattern tries to eliminate any visibly noticeable geometrical pattern. As the distribution of the dots requires a lot of processing power, the printout time is higher than with the Ordered pattern.
The dot pattern is equivalent to those used for newspapers printing. In this mode printouts are not as smooth as with the Error diffusion pattern but significantly faster.
Switch on/off the subsequent adjustments. There are two groups of color correction sliders. By pressing the "Standard" or "Advanced" button you make the corresponding group of settings visible.
Use this slider to render the printout lighter or darker.The higher the value the brighter your printouts will get. Range: -50..50, default: 0
higher brightness -> brighter printouts
lower brightness  -> darker printouts
Use this slider to increase or decrease the contrast of your printout. Range: -50..50, default: 0
higher values -> increase contrast
                 (dark colors get darker, bright colors get brighter)
lower values  -> decrease contrast
Change the color saturation. Range: -50..50, default: 0
higher color saturation -> more vibrant colors
lower color saturation  -> less vibrant colors
Attention: Use this setting only if you want to adjust the brightness of printouts to the currently used monitor and / or scanner!
The slider lets you modfy the brightness according to the Gamma function (y=x^gamma). This will allow you to change the intermediate brightness values, without changing the extremes, i.e. pure black will still remain pure black on the final hardcopy, and white will remain white. Set the slider to the gamma value of your monitor. The default value is 180 (gamma=1.8) which is also the default for most scanners.
Higher gamma value -> darker printouts
lower gamma value  -> brighter printouts
Change the amount of ink applied
(range -50..50, default 0).
Attention: If too much ink is applied, ink won't dry properly and may smear.
The amount of yellow ink applied (range -50..50, default 0).
higher value -> use more yellow ink
lower value  -> use less yellow ink
The amount of magenta ink applied (range -50..50, default 0).
higher value -> use more magenta ink
lower value  -> use less magenta ink
The amount of cyan ink applied (range -50..50, default 0).
higher value -> use more cyan ink
lower value  -> use less cyan ink
The amount of black ink applied (range -50..50, default 0).
higher value -> use more black ink
lower value  -> use less black ink
The settings in this menu page determine the print size and position
of images. This is only used if bitmap images (e.g. PBM, PPM, BMP, GIF,
JPEG) are printed directly from command line with lp or
lpr.
The default settings that are specified on this page can be overwritten from command line, e.g.
lp -d tp0 -o scaling=50 filename.jpg
Further optinos can be found in the CUPS HTML online help http://localhost:631/sum.html.
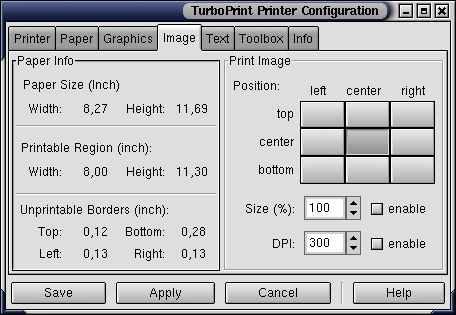
This box gives imformation about the dimensions of the chosen paper. Normally printers cannot print at a small border of the paper (indicated as "Unprintable borders"). So the maximum print area (indicated as "Printable region") is a bit smaller than the paper size.
Images can be positioned either in one of the four edges of the paper or be centered horizontally and/or vertically. Just select one of the fields in the shown table. The selected horizontal (left/right/center) and vertical (top/bottom/middle) position determines where your image is printed on the paper.
By default the print size of an image is determined from the "dots per inch" information that is stored in the image file:
width = image width in pixels / horizontal dots per inch
height = image height in pixels / vertical dots per inch
Note: Some file formats don't contain DPI information, e.g. PBM / PPM.
It is possible to specify a different printsize with either the "Size" or the "DPI" setting.
The Size value is only considered if its corresponding "enable" button is activated. In this case the image size is specified in percent of the printable area of the page. 100% means that the image is printed in the maximum size possible. Note that the image may be rotated to fit in the page.
If the Size field is deactivated the image size is calculated from the "dots per inch" information stored in the image file. you can specify a "dots per inch" value that overrides the values stored in the image file. To do so the "enable" button of the "DPI" field must be activated.
Example: An image with 600 dots width and 300 DPI will be printed 2 inches wide. If you set a DPI value of only 150 then the image will be printed twice as wide.
These are settings for the layout of simple ASCII text documents. a2ps is used for formating ASCII text. If a2ps is not installed, enscript will be used instead.
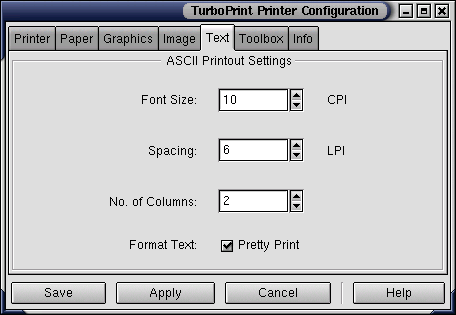
Select the desired font size for printing ASCII text. The entered value is measured in CPI (characters per inch).
The line spacing is determined by the entered number of lines per inch (LPI).
Specify the number of text columns on the page (default = 1).
By choice your ASCII text can be formatted when it is printed. If you activate the "Pretty Print" button headers (file name and page size) will be added to the printout and key words will be highlighted (such as "and", "or").
The Toolbox is used for maintenance jobs with mainly ink jet printers. It can carry out tasks like nozzle check, head cleaning, head alignment, ink quantity check, etc.
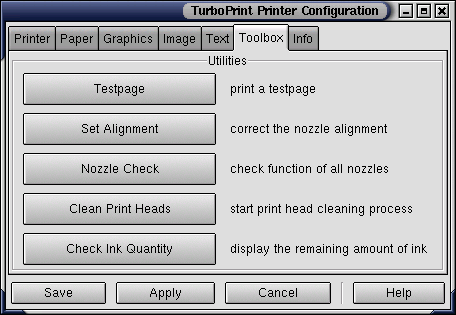
There may be some jobs which are not supported by your printer. The corresponding buttons are "ghosted" then.
The following tools are available and can be accessed by pressing the corresponding button:
Print a testpage. This is useful to check if the printer is working and is properly connected to the computer. Additionally, for a correct printout the appropriate printer driver must be selected.
Align the black & color print heads and/or align bidirectional printing. The alignment procedure depends on the printer manufacturer and model. Usually a page with several lines of test patterns (lines, crosshairs) is printed. For each line, the number of the pattern with the best alignment is requested and must be entered (e.g.the pattern where two lines align best).
Please just follow the directions given by the "Alignment" tool.
Prints a nozzle check pattern. This requires one page of paper. For each color a "staircase pattern" is printed. If one or several steps of the "staircase" is missing or smeared, the print heads should be cleaned (see next tool).
Clean the print heads. This may consume some ink (like printing one or several pages), so cleaning should only be done if really necessary.
Show the remaining quantity of ink in the cartridges (only available for some printers). The amount is displayed separately for each ink color. 100% means the cartridge is full. You need to be logged in as "root". This is because TurboPrint has to access the parallel port directly. Otherwise the "Ink quantity" tool is not available.
Attention: You can temporarily change to superuser-mode by the "su root" command from shell. Sometimes it is not possible to start a GUI program then. If this should be the case you will have to configure the XWindow system for the new user by the following shell commands:
xhost +
su root
export DISPLAY=:0
xtpconfig
This function is only available with some printers where the ink cartridge can't be exchanged without a control program. Please follow the directions given by xtpconfig. You need to be logged in as "root". This is because TurboPrint has to access the parallel port directly.
The info page contains information on the TurboPrint version (version number, copyright notice) and license status:
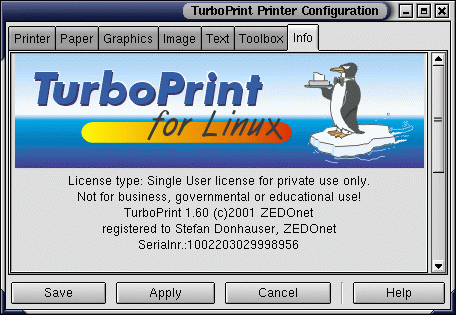
Before you have purchased a license with a personal keyfile.
To use TurboPrint as full version please purchase a license with a personal keyfile at www.turboprint.de.
After you have added your personal keyfile and reinstalled TurboPrint.
Should you already have bought a license, please follow the instructions that came with the keyfile and reinstall.