Before you can use TurboPrint, you must select the printer(s) you are using. This is done in the TurboPrint setup menu, xtpsetup.
Attention: You have to be logged in as "root" for the setup program. You can temporarily change to superuser-mode by the "su root" command from shell. Sometimes it is not possible to start a GUI program then. If this should be the case you will have to configure the XWindow system for the new user by the following shell commands:
xhost +
su root
export DISPLAY=:0
xtpsetup
There is also a command line version tpsetup.
Please see the tpsetup man page (man tpsetup).
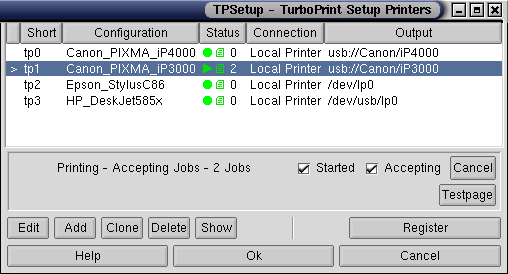
Most part of the window is taken up by a list which shows the printer configurations that are managed by TurboPrint. A printer configuration is just like a LINUX printer queue: For every printer that is attached to the workstation (or a printer server on the network), one or more configurations can exist - e.g. one for draft and one for photo printing.

The columns of the configuration list are:
">" is shown here, if this configuration is the default printer for the "lpr" command.
Short name for the printer configuration. Use this when printing with the "lpr" command.
Long name for the printer configuration
Displays the printer status (CUPS printing system only):
The symbol on the left shows if the printer is started (green circle = ready, green triangle = printing) or stopped (red circle).
The symbol in the middle shows if new print jobs are accepted (green) or rejected (red).
The number on the right shows the number of print jobs in the print queue.
How the printer is connected, e.g. local printer / remote printer
The name of a local device (e.g. /dev/lp0 for the
parallel port) or a remote printer name
The location of the spool directory (not visible for CUPS printing system)
One of the lines in the configuration list is displayed inverted (white on blue) - this is the currently selected configuration. The "Edit", "Clone" and "Delete" commands described later in this manual all work on the selected configuration.
You can select a configuration by clicking on the list entry with the left mouse button.
If you click on a list entry using the right mouse button, a popup menu will appear:
Make this configuration the default printer
Edit the configuration
Create a copy of the configuration
Delete the configuration
In the middle of the setup window the status display is located (CUPS printing system only):

Here you can see the printer status for the current configuration. A message from the CUPS printing system may be displayed here, e.g.:
Unable to open USB device - the USB printer cannot be accessed
     (e.g. switched off or not connected)
Media tray empty - no paper in the printer
Use the checkbuttons "Started" und "Accepting" to change the printer status:
Started:
     selected     => the printer is ready or printing
     not selected => the printer is paused

Accepting:
     selected     => new print jobs are accepted
     not selected => new print jobs are rejected
The button "Cancel" deletes all print jobs for this queue.
Use the button "Test page" to print a test page.
At the bottom of the setup window the following buttons can be found:
Edit the currently selected configuration. The edit window will be opened.
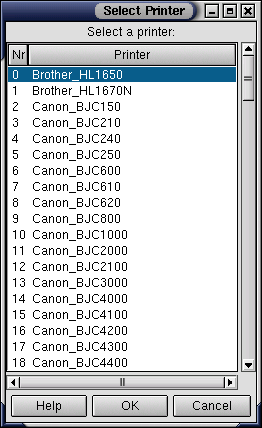
Add a new configuration. First you can determine the printer model in the select printer dialog. Then you can enter the configuration name and the specify the printer connection in the edit printer dialog.
Create a copy of the selected configuration.
Delete the selected configuration.
Show also the other printer queues that are defined in the /etc/printcap file. This is a toggle button which can be switched on or off. The purpose is to make a printer queue that is not maintained by TurboPrint the default printer (click with the right mouse button on an entry and choose "make default").
Installieren a TurboPrint license keyfile to unlock all features.
Save all changes and leave the setup menu.
Discard all changes and leave the setup menu.
In this dialog the printer model for a new configuration can be chosen. Printer models are shown with manufacturer and model name and are listed in alphabetical order.

For many Hewlett-Packard printers the model number contains an
"x" which means that several models are supported by this
driver. E.g. "HP_DeskJet95xC" supports the printers
HP_DeskJet950Cxi/se, HP_DeskJet952Cxi/se
and HP_DeskJet959Cxi/se.
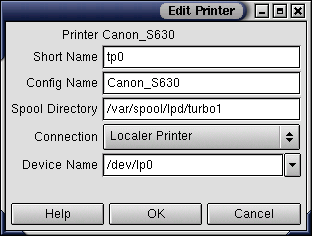
This dialog offers options to change the configuration name and to specify the printer port or a remote printer.

The name of the printer driver is displayed here.
This is a short name for the printer configuration.
The short name is used when printing via
lpr. E.g.
if the short name is "tp0", enter
lpr -Ptp0 printjob.ps
"tp0"
for the first printer,
"tp1" for the second printer etc.
The short name and the config name must not contain space
characters, use the "_" character
instead.
The name of the printer configuration.
By default this is identical with the name of the printer
driver, i.e. the printer manufacturer and model, e.g.
Epson_StylusColor900.
Of course you may add some
additional information if you have to discern several
printer queues for the same physical printer, e.g.
Epson_StylusColor900_draft
and Epson_StylusColor900_hq.
The path name of the spool directory.
The field is read-only and can't be changed.
This might be of interest to retrieve the logfile
within the spool directory (usually called
"LOG").
There are several possibilities how the printer is connected:
The printer is directly connected to a port (parallel, serial, USB)
The output is sent to a file
Remote Unix LPD printer - the printer is connected to a printer server
Remote Windows printer - the printer is connected
Remote Netware printer - the printer is connected to a Netware server
This protocol is often used for printers with built-in network adapter or printers that are hooked up to a printer server box.
Use the setting "Other / CUPS-URI" to enter the CUPS device address directly. This is only necessary if the printer cannot be accessed with one of the connection types listed above.
The CUPS URI could be e.g.
ipp://servername/printers/printername
The printer "printername" which is attached to the server "servername" will be accessed using the internet printing protocol ("IPP").
Depending on the setting of "Connection", different input fields are available:
The local device that the printer is connected to, e.g.
"/dev/lp0" for the first parallel port or
"/dev/usb/lp0" for the first usb printer.
On current Linux distributions USB printers can also be accessed by
the device name.
In this case you can choose your printer from the drop down list
next to the "Device Name" entry (click on the arrow key), e.g.
usb://canon/i560.
If the output should be stored in a file. Please enter
the full path name. The lp daemon must have write access,
so the /tmp
directory is a possible choice.
With the CUPS spooler printing to a file may have to be
enabled first by editing the file
/etc/cups/cupsd.conf. Uncomment or add the line
FileDevice Yes
to do this.
The name of a remote printer.
The name of a printer server.
The port number for the socket protocol is in most cases "9100" for the first printer, "9101" for the second printer etc.
Optional, if this printer is not generally available.
Optional, if a user name is required.
The password name is stored visible in this version, it is not encrypted. Never use the same password for printer access and login!
Optional: The name of the workgroup, if the printer server is not in the same workgroup.
Optional: The IP address, if the printer server is not known by name.
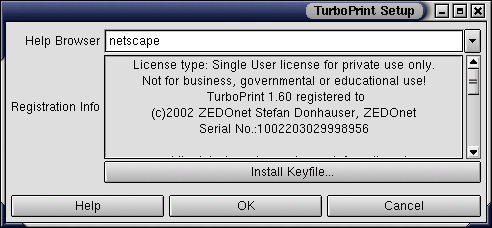
In this dialog you can install a TurboPrint license key an make further settings.

Here you can select the WEB browser that will display the TurboPrint online manual. You can either choose an entry from the list or enter the browser name manually.
Note: The WEB browser must be installed on your system! You can use the "Help" button on this window to check if the browser can be started.
Shows information on your TurboPrint license. After installation
"*** not registered ***" will be displayed until you have
installed your license keyfile (see below).
A file selection window will open where you can select the
license keyfile. If it is stored on a floppy disk you may have to
mount the disk first (enter "mount /floppy" in a shell
window).
After you have chosen the keyfile, press "OK" return. Your name should now be visible in the "registration info" field.