|
 |
|
GnuPG Gentoo user guide 1. Introduction What you will get in this guide This guide assumes that you are familiar with public-key cryptography, encryption, and digital signatures. If this is not the case take a look at the GnuPG handbook chapter 2. This guide will teach you how to install GnuPG, how to create your keypair, how to add keys to your keyring, how to submit your public key to keyserver, and how to (sign/encrypt)/(verify/decode) messages you send/receive. You will also learn how to encrypt files in your local computer to prevent people from reading their contents. Installation of required software At a very basic level you need to emerge gnupg, if you wish to have an e-mail client using gnupg you can use pine (emerge pinepgp), mutt (emerge mutt), Mozilla/Netscape Mail, evolution (evolution is a GNOME Microsoft Outlook work alike) and KDE's own KMail (KMail is part of the kdenetwork package). Kgpg might interest you if you use KDE. This small program allows you to generate keypairs, import keys from ASCII files, sign imported keys, export keys, and a few more features (it lacks importing keys from keyservers, but you will learn how to that from the command line). 2. Generating your key and adding keys to your public keyring To create your key, just run gpg --gen-key. The first time you run it, it will create some directories; run it again to create the keys:
Here you have chance to choose the type of key you want to use. Most users will go for the default DSA and ElGamal. Next is the key size, remember that bigger is better, but don't use larger than 2048 with DSA/ElGamal keys. Normally 1024 is more than enough for normal e-mail. After size comes the expiration date. Here smaller is better, but most users can go for a key that never expires or to something like 1 or 2 years.
Now it is time to enter some personal information about yourself. If you are going to send your public key to other people you have to use your real address here.
Now enter your key password two times. It is a good idea to use a strong password. If someone ever gets hold of your private key and cracks your password, he will be able to send messages signed by "you" that everyone will think that were sent by you. Then, GnuPG will generate your key. Moving the mouse or having a mp3 playing in the background will help speed up the process because it generates random data. Generating a revocation certificate
After creating your keys you should create a revocation certificate. Doing this allows you to revoke your key in case something nasty happens to your key (someone gets hold of your key/passphrase).
The gpg --list-keys command lists keys in your public keyring. You may use it to see the ID of your key so that you can create the revoke certificate. Now it is a good idea to copy all the .gnupg directory and the revocation ASCII armor (revoke.asc) to some secure medium (two floppy's or a CD-R you store in safe location). Remember that revoke.asc can be used to revoke your keys and make them unusable in the future.
To export your key, you type gpg --armor --output john.asc --export john@nowhere.someplace.flick. You can almost always use the key ID or something that identifies the key (here we used an e-mail address). He now has a john.asc that he can send his friends, or place in his web page so that people can communicate safely with him. To add files to your public keyring, you must first import it, then check the key fingerprint. After you verify the fingerprint you should validate it.
Now we will be adding Luis Pinto's (a friend of mine) public key to our public keyring. After giving him a call and asking him for his key fingerprint, I compare the fingerprint to the output of the fpr command. As the key is authentic, i add it to the public keyring. In this particular case, Luis's key will expire in 2003-12-01 so i am asked if I want my signature to expire at the same time.
3. Exchanging keys with keyservers Now that you have your key, it is probably a good idea to send it to the world keyserver. There are a lot of keyservers in the world and most of them exchange keys between them. Here we are going to send Luis's key to the pgp.mit.edu server. This uses HTTP, so if you need to use a proxy for HTTP traffic don't forget to set it (export http_proxy=http://proxy_host:port/). The command for sending the key is: gpg --keyserver pgp.mit.edu --keyserver-options honor-http-proxy --send-key john@nowhere.someplace.flick . If you don't need a HTTP proxy you can remove the --keyserver-options honor-http-proxy. You can also send other people's keys that you have signed to the keyserver. We could send Luis Pinto's key to the keyserver. In this way someone that trusts your key can use the signature that you have placed there to trust Luis's key. Now we are going to search for Gustavo Felisberto's key and add it to the keyring of John Doe (just in case you did not notice Gustavo Felisberto is the person writing this guide :) ).
As you can see from the server response I have a few keys submited to the key server, but i currently only use B9F2D52A. Now John Doe could get it and sign it if he trusts it. 4. Working with documents Let's say that you have a file that you wish to send Luis now. You can encrypt it, sign it, or encrypt it and sign it. Encypting means that only Luis will be able to open it. The signature tells Luis that it was really you who created the file. The next three comands will do just that, encrypt, sign and encrypt/sign.
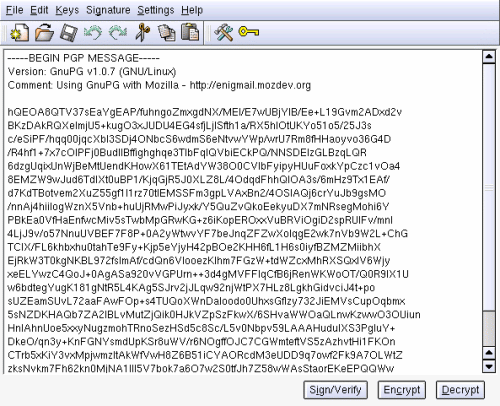
This will create binary files. If you wish to create ascii files, just add a --clearsign to the begining of the command. Decrypting and verifying signatures Suppose that you have received a file which is encrypted to you. The command to decrypt it is gpg --output document --decrypt encrypted_doc.gpg. This will decrypt the document and verify the signature (if there is one). 5. GnuPG interfaces kgpg is a nice GUI for GNUPG. In the main screen you can paste the text that you wish to sign or encrypt, and you can also paste the ASCII armored text that you wich to decrypt.
In this image you can see the kgpg main window with ASCII armored and encrypted text pasted into it. From here you can decrypt it (you will have to provide your password), encrypt other files, past new text to sign....
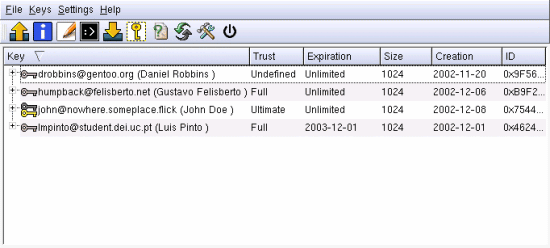
Now you can see the keymanaging window. From here we see our good key for John Doe. The two trusted keys for Gustavo and Luis, and the untrusted key for Daniel Robbins ( I still have not given him a call to check his fingerprint :) ).
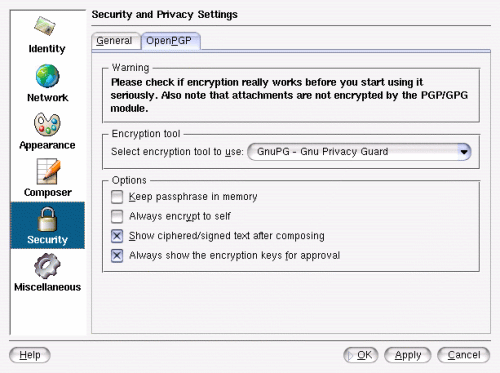
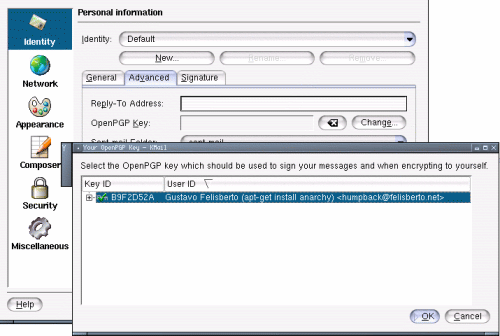
Mozilla's version from 1.0 or above comes with Enigmail, a plugin for the mail client that is pretty simple to configure. You just go to Preferences -> Privacy & Security -> Enigmail. There you enter your key e-mail and thats it. Mails that come with an untrusted pgp or gpg signature will be marked with a broken pen. Others that have good signatures will appear with a nice straight pen. Enigmail even comes with the ability to get keys from keyservers, but if it has problems it will print some very weird messages (but you still remember how to use the command line, right?). Kmail is also pretty easy to setup. I will just post a few pictures on how to set it up. Basically you have to tell KMail to use GPG and then which key to sign with. 6. Final thoughts, Credits and Copyrights I had some problems with photos in keys. Check the version you are using. If you have GnuPG 1.2.1-r1 and up you are probably ok, older versions may have problems. Also most keyservers dont like keys with photos. Gpg is a very complex tool, it lets you do much more than what I have covered here. This document is for the user that is new to GnuPG. For more information, you should check the GnuPG Website. I don't talk of other tools like pgp4pine, gpgpine, evolution and maybe Windows tools, I will probably extend this document in the future. John Michael Ashley's GnuPG Handbook is simply wonderful. It is a very good book for beginners. Everyone in the #gentoo-doc team you guys rock. Tiago Serra for getting me back to the privacy track. Copyright by Gustavo Felisberto. Gentoo Technologies Inc. is allowed to publish this document as it sees fit. The contents of this document are licensed under the Creative Commons - Attribution / Share Alike license. |
|