
Cisco Certified Network Associate Certification Exam Objectives - Test 640-407.
1) Identify and describe the functions of each of the seven layers of the OSI (Open Systems Interconnection) reference model.
The physical layer defines the electrical, mechanical, procedural, and functional specifications for activating, maintaining, and deactivating the physical link between communicating networking systems. Physical layer specifications define characteristics such as voltage levels, timing of voltage changes, physical data rates, maximum transmission distances, and physical connectors. Physical-layer implementations can be categorised as either LAN or WAN specifications.
The data link layer provides reliable transit of data across a physical network link. Different data link layer specifications define different network and protocol characteristics, including physical addressing, network topology, error notification, sequencing of frames, and flow control. Physical addressing (as opposed to networking addressing) defines how devices are addressed at the data link layer. Network topology consists of the data-link layer specifications that often define how devices are to be physically connected, such as in a bus or a ring topology. Error notification alerts upper-layer protocols that a transmission error has occurred, and the sequencing of data frames reorders frames that are transmitted out of sequence. Finally, flow control moderates the transmission of data so that the receiving device is not overwhelmed with more traffic than it can handle at one time.
The institute of Electrical and Electronics Engineers (IEEE) has subdivided the data-link layer into two sublayers: Logical Link Control (LLC) and Media Access Control (MAC). The Logical Link Control sublayer of the data-link layer manages communications between devices over a single link of a network. LLC is defined in the IEEE 802.2 specification and supports both connectionless and connection orientated services used by high-layer protocols. IEEE 802.2 defines a number of fields in data-link layer frames that enable multiple higher-layer protocols to share a single physical data link. The Media Access Control (MAC) sublayer of the data link layer manages protocol access to the physical network medium. The IEEE MAC specification defines MAC addresses, which enable multiple devices to uniquely identify one another at the data link layer.
The network layer provides routing and related functions that enable multiple data links to be combined into an internetwork. This is accomplished by the logical addressing (as opposed to the physical addressing) of devices. The network layer supports both connection-orientated and connectionless service from higher-layer protocols. Network-layer protocols typically are routing protocols, but other types of protocols are implemented at the network layer as well.
Some common routing protocols include Border Gateway Protocol (BGP), an Internet interdomain routing protocol; Open Shortest Path First (OSPF), a link-state, interior gateway protocol developed for use in TCP/IP networks; and Routing Information Protocol (RIP), a distance vector, internet routing protocol that uses hop count as its metric. Routing protocols affect the network layer and how it operates BUT routing protocols are actually much higher up the OSI model (typically they are considered applications).
The transport layer implements reliable internetwork data transport services that are transparent to upper layers. Transport-layer functions typically include flow control, multiplexing, virtual circuit management, and error checking and recovery.
Flow control manages data management between devices so that the transmitting device does not send more data than the receiving device can process. Multiplexing enables data from several applications to be transmitted onto a single physical link. Virtual circuits are established, maintained, and terminated by the transport layer. Error checking involves creating various mechanisms for detecting transmission errors, while error recovery involves taking an action, such as requesting that data be retransmitted, to resolve any errors that occur.
Some transport-layer implementations include Transport Control Protocol, Name Binding Protocol, and OSI transport protocols. Transport Control Protocol (TCP) is the protocol in the TCP/IP suite that provides reliable transmission of data. Name Binding Protocol (NBP) is the protocol that associates Appletalk names with addresses. OSI transport protocols are a series of transport protocols in the OSI protocol suite.
The session layer establishes, manages, and terminates communication sessions between presentation layer entities. Communication sessions consist of service requests and service responses that occur between applications located in different network devices. These requests and responses are co-ordinated by protocols implemented at the session layer. Some examples of session-layer implementations include Zone Information Protocol (ZIP), the Appletalk protocol that co-ordinates the name binding process; and Session Control Protocol (SCP), the DECnet Phase IV session-layer protocol.
The presentation layer provides a variety of coding and conversion functions that are applied to application layer data. These functions ensure that information sent from the application of one system will be readable by the application of another system. Some examples of presentation-layer coding and conversion schemes include common data representation formats, conversion of character representation formats, common data compression schemes, and common data encryption schemes.
Common data representation formats, or the use of standard image, sound, and video formats, enable the interchange of application data between different types of computer systems. Conversion schemes are used to exchange information with systems by using different text and data representations, such as EBCDIC and ASCII. Standard data compression schemes enable data that is compressed at the source device to be properly decompressed at the destination. Standard data encryption schemes enable data encrypted at the source device to be properly deciphered at the destination.
Presentation-layer implementations are not typically associated with a particular protocol stack. Some well-known standards for video include QuickTime and Motion (MPEG). QuickTime is an Apple Computer specification for video and audio, and MPEG is a standard for video compression and coding.
Among the well-known graphic image formats are Graphics Interchange Format (GIF), Joint Photographic Experts Group (JPEG), and Tagged Image File Format (TIFF). GIF is a standard for compressing and coding graphic images. JPEG is another compression and coding standard for graphic images, and TIFF is a standard coding format for graphic images.
The application layer is the OSI layer closest to the end user, which means that both the OSI applications layer and the user interact directly with the software application.
This layer interacts with software applications that implement a communicating component. Such application programs fall outside the scope of the OSI model. Application-layer functions typically include identifying communication partners, determining resource availability, and synchronising communication.
When identifying communication partners, the application layer determines the identity and availability communication partners for an application with data to transmit. When determining resource availability, the application layer must decide whether sufficient network resources for the requested communication exist. In synchronising communication, all communication between applications requires co-operation that is managed by the application layer.
Two key types of application-layer implementations are TCP/IP applications and OSI applications. TCP/IP applications are protocols, such as Telnet, File Transfer Protocol (FTP), and Simple Mail Transfer Protocol (SMTP), that exist in the Internet Protocol suite. OSI applications are protocols, such as File Transfer Access Management (FTAM), Virtual Terminal Protocol (VTP), and Common Management Information Protocol (CMIP), that exist in the OSI suite. Ro
2) Describe connection-oriented network service and connectionless network service, and identify the key differences between them.
In general, networking protocols and the data traffic that they support can be characterised as being either connection-oriented or connectionless. In brief, connection-oriented data handling involves using a specific path that is established for the duration of a connection. Connectionless data handling involves passing data through a permanently established connection.
Connection-oriented service involves three phases: connection establishment, data transfer, and connection termination.
During the connection-establishment phase, single path between the source and the destination systems is determined. Network resources typically are reserved at the time to ensure a consistent grade of service, such as a guaranteed throughput rate.
In the data transfer phase, data is transmitted sequentially over the path that has been established. Data always arrives at the destination system in the order in which it was sent.
During the connection-termination phase, an established connection that is no longer needed is terminated. Further communication between the source and destination systems requires that a new connection be established.
Connection-oriented network service carries two significant disadvantages over connectionless, static-path selection and the static reservation of network resources. Static-path selection can create difficulty because all traffic must travel along the same static path. A failure anywhere along the path causes the connection to fail. Static reservation of network resources causes difficulty because it requires a guaranteed rate of throughput and, thus, a commitment of resources that other network users cannot share. Unless the connection uses full, uninterrupted throughput, bandwidth is not used efficiently.
Connection-oriented services, however are useful for transmitting data from applications that don’t tolerate delays and packet resequencing. Voice and video applications are typically based on connection-oriented services.
As another disadvantage, connectionless network service does not predetermine the path from the source to the destination system, nor are packet sequencing, data throughput, and other network resources guaranteed. Each packet must be completely addressed because different paths through the network may be selected for different packets, based on a variety of influences. Each packet is transmitted independently by the source system and is handled independently by intermediate network devices.
Connectionless service, however, offers two important advantages over connection-oriented service: dynamic-path selection and dynamic-bandwidth allocation. Dynamic-path selection enables traffic to be routed around network failures because paths are selected on a packet-by-packet basis. With dynamic-bandwidth allocation, bandwidth is used more efficiently because network resources are not allocated a bandwidth that they will not use.
Connectionless services are useful for transmitting data from applications that can tolerate some delay and resequencing. Data-based applications typically are based on connectionless service.
3) Describe data link addresses and network addresses, and identify the key differences between them.
A data-link layer address uniquely identifies each physical network connection of a network device. Data-link addresses sometimes are referred as physical or hardware addresses. Data-link addresses usually exist within a flat address space and have a pre-established and typically fixed relationship to a specific device.
End systems generally have only one physical network connection, and thus have only one data-link address. Routers and other internetworking devices typically have multiple physical network connections and therefore also have multiple data-link addresses.
A network-layer address identifies an entity at the network layer of the OSI layers. Network addresses usually exist within a hierarchical address space and sometimes are called virtual or logical addresses.
The relationship between a network address and a device is logical and unfixed; it typically is based either on a physical network characteristics (the device is on a particular network segment) or on groupings that have no physical basis (the device is part of an Appletalk zone). End systems require one network-layer address for each network-layer protocol they support. (This assumes that the device has only one physical network connection.) Routers and other internetworking devices require one network-layer address per physical network connection for each network layer protocol supported. A router, for example, with three interfaces each running AppleTalk, TCP/IP, and OSI must have three network-layer addresses for each interface. The router therefore has nine network-layer interfaces.
4) Define and describe the function of a MAC address.
Media Access Control (MAC) addresses consist of a subset of data-link layer addresses. MAC addresses identify network entities in LANs that implement the IEEE MAC addresses of the data-link layer. As with most data-link addresses, MAC addresses are unique for each LAN interface.
MAC addresses are 48 bits in length and are expressed as 12 hexadecimal digits. The first 6 hexadecimal digits, which are administered by the IEEE, identify the manufacturer or vendor and thus compromise the Organisational Unique Identifier (OUI). The last 6 hexadecimal digits comprise the interface serial number, or another value administered by the specific vendor. MAC addresses sometimes are called burned-in-addresses (BIAs) because they are burned into read-only memory (ROM) and are copied into random-access memory (RAM) when the interface card initialises.
Different protocol suites use different methods for determining the MAC address of a device. The following three methods are used most often: Address Resolution Protocol (ARP) maps network addresses to MAC addresses. Hello protocol enables network devices to learn the MAC addresses of other network devices. MAC addresses are either embedded in the network-layer address or are generated by an algorithm
Address resolution is the process of mapping network addresses to the Media Access Control (MAC) addresses. This process is accomplished by using the Address Resolution Protocol (ARP), which is implemented by many protocol suites. When a network address is successfully associated with a MAC address, the network device stores the information in the ARP cache. The ARP cache enables devices to send traffic to a destination without creating ARP traffic because the MAC address of the destination is already known.
The process of address resolution differs slightly, depending on the network environment. Address resolution on a single LAN begins when End system A broadcasts an ARP request onto the LAN in an attempt to learn the MAC address of End system B. The broadcast is received and processed by all devices on the LAN, although only End system B replies to the ARP request by sending an ARP reply containing its MAC address to End System A. End System A receives the reply and saves the MAC address of End System B in its ARP cache. (The ARP cache is where network addresses are associated with MAC addresses.) Whenever End System A must communicate with End System B, it checks the ARP cache, finds the MAC address of System B, and sends the frame directly without first having to use an ARP request.
Address resolution works differently, however, when source and destination devices are attached to different LANs that are interconnected by a router. End System Y broadcasts an ARP request onto the LAN in an attempt to learn the MAC address to End System Z. The broadcast is received and processed by all devices on the LAN, including Router X, which acts as a proxy for End System Z by checking its routing table to determine that End System Z is located on a different LAN. Router X then replies to the ARP request from End system Y, sending an ARP reply containing its own MAC address as if it belonged to End System Z. End System Y receives the ARP reply and saves the MAC address of Router X in its ARP cache in the entry for End System Z. When End System Y must communicate with End System Z, it checks the ARP cache, finds the MAC address of Router X, and sends the frame directly without using ARP requests. Router X receives the traffic from End System Y and forwards it to End System Z on the other LAN.
The Hello protocol is a network-layer protocol that enables network devices to identify one another and indicate that they are still functional. When a new end system powers up, for example, it broadcasts Hello messages onto the network, Devices on the network then return Hello replies, and Hello messages are also sent at specific intervals to indicate that they are still functional. Network devices can learn the MAC addresses of other devices by examining Hello-protocol packets.
Three protocols use predictable MAC addresses. In these protocol suites, MAC addresses are predictable because the network layer either embeds the MAC address in the network-layer address or uses an algorithm to determine the MAC address. The three protocols are Xerox Network Systems (XNS), Novell Internetwork Packet Exchange (IPX), and DECnet Phase IV.
5) Define flow control and describe the three basic methods used in networking.
Flow control is function that prevents network congestion by ensuring that transmitting devices do not overwhelm receiving devices with data. Countless possible causes of network congestion exist. A high-speed computer, for example, may generate traffic faster than the network can transfer it, or faster than the destination device can receive and process it. The three commonly used methods for handling network congestion are buffering, transmitting source-quench messages, and windowing.
Buffering is used by network devices to temporarily store bursts of excess data in memory until they can be processed. Occasional data bursts are easily handled by buffering. Excess data bursts can exhaust memory, however, forcing the device to discard any additional datagrams that arrive.
Source-quench messages are used by receiving devices to help prevent their buffers from overflowing. The receiving devices sends source-quench messages to request that the source reduce its current rate of data transmission. First, the receiving device begins discarding received data due to overflowing buffers. Second, the receiving device begins sending source-quench messages to the transmitting device at the rate of one message for each packet dropped. The source device receives the source-quench messages and lowers the data rate until it stops receiving the messages. Finally, the source device then gradually increases the data rate as long as no further source-quench requests are received.
Windowing is a flow-control scheme in which the source device requires an acknowledgement from the destination after a certain number of packets have been transmitted. With a window size of three, the source requires an acknowledgement after sending three packets, as follows. First, the source device sends three packets to the destination device. Then, after receiving the three packets, the destination device sends an acknowledgement to the source. The source receives the acknowledgement and sends three more packets. If the destination does not receive one or more of the packets for some reason, such as overflowing buffers, it does not receive enough packets to send an acknowledgement. The source then retransmits the packets at a reduced transmission rate.
Pacing is used by protocols to insure that data is transmitted at a rate which the remote device can manage.
6) Differentiate between the following WAN services: Frame Relay, ISDN/LAPD, HDLC, & PPP.
Switched WAN services:
X.25 Overview
X.25 is an International Telecommunication Union Telecommunication Standardisation Sector (ITU-T) protocol standard for WAN communications. The X.25 standard defines how connections between user devices and network devices are established and maintained.
X.25 is designed to operate effectively regardless of the type of systems connected to the network. It is typically used in the packet switched networks (PSNs) of common carriers (the telephone companies). Subscribers are charged based on their use of the network.
The development of the X.25 standard was initiated by the common carriers in the 1970s. At that time, there was a need for WAN protocols capable of providing connectivity across public data networks (PDNs). X.25 is now administered as an international standard by the ITU-T.
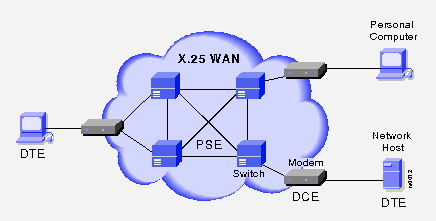
X.25 Network Components
X.25 network devices fall into three general categories:
Data terminal equipment (DTE) -- DTE devices are end systems that communicate across the X.25 network. They are usually terminals, personal computers, or network hosts, and are located on the premises of individual subscribers.
Data circuit-terminating equipment (DCE) -- DCE devices are special communications devices such as modems and packet switches. They provide the interface between DTE devices and a packet switching exchange (PSE), and are generally located in the carrier's facilities.
Packet switching exchange (PSE) -- PSEs are switches that compose the bulk of the carrier's network. They transfer data from one DTE device to another through the X.25 packet switched network (PSN).
The following figure shows the relationship between the three types of X.25 network devices:
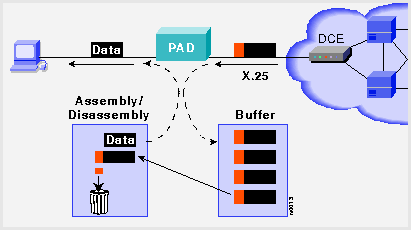
Packet Assembler/Disassembler (PAD)
The packet assembler/disassembler (PAD) is a device commonly found in X.25 networks. PADs are used when a DTE device (such as a character-mode terminal) is too simple to implement the full X.25 functionality.
The PAD is located between a DTE device and a DCE device. It performs three primary functions:
Buffering -- The PAD buffers data sent to or from the DTE device.
Packet assembly -- The PAD assembles outgoing data into packets and forwards them to the DCE device. (This includes adding an X.25 header.)
Packet disassembly -- The PAD disassembles incoming packets before forwarding the data to the DTE. (This includes removing the X.25 header.)
The following figure shows the basic operation of the PAD when receiving packets from the X.25 WAN:

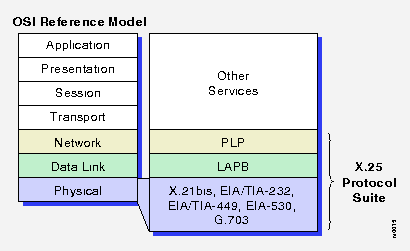
X.25 Protocol Suite
The X.25 protocol suite maps to the lowest three layers of the OSI reference model. The following protocols are typically used in X.25 implementations:
• Packet Layer Protocol (PLP)
• Link Access Procedure, Balanced (LAPB)
• X.21bis and other physical layer serial interfaces (such as
EIA/TIA-232, EIA/TIA-449, EIA-530, G.703, and so forth)
The following figure maps the key X.25 protocols to the layers of the OSI reference model:
Frame Relay Overview
Frame Relay is a high-performance wide-area network (WAN) protocol that operates at the physical and data link layers of the Open System Interconnection (OSI) reference model.
Frame Relay was originally designed for use across Integrated Services Digital Network (ISDN) interfaces. Today, it is used over a variety of other network interfaces as well.
Frame Relay Features
Frames Relay provides a data communications interface between user devices and network devices. This interface forms the basis for communication between user devices across a WAN.
Typical communication speeds for Frame Relay are between 56 Kbps and 2 Mbps (although lower and higher speeds are supported).
Frame Relay is considerably more efficient than X.25, the protocol for which it is often considered a replacement. Because it supports technological advances such as fibre-optic cabling and digital transmission, Frame Relay can eliminate time-consuming processes (such
as error correction and flow control) that are necessary when using older, less reliable WAN media and protocols.
Frame Relay Standardisation
Internationally, Frame Relay was standardised by the International Telecommunications Union - Telecommunications Sector (ITU-T). In the United States, Frame Relay is an American National Standards Institute (ANSI) standard.
The Local Management Interface (LMI) specification, developed in 1990, further extends the functionality of Frame Relay.
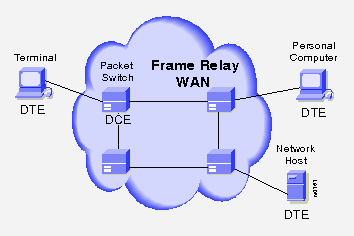
Frame Relay Devices
Devices attached to a Frame Relay WAN fall into two general categories:
Data terminal equipment (DTE) -- DTE are customer-owned end node and internetworking devices. Examples of DTE devices are terminals, personal computers, routers, and bridges.
Data circuit-terminating equipment (DCE) -- DCE are carrier-owned internetworking devices. In most cases, these are packet switches (although routers or other devices can be configured as DCE as well).
DTE and DCE devices are logical entities. That is, DTE devices initiate a communications exchange, and DCE devices respond.
The following figure shows the relationship between the two categories of devices:
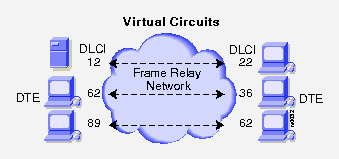
Frame Relay Virtual Circuits
Frame Relay provides connection-oriented data link layer communication. This service is implemented using virtual circuits.
A Frame Relay virtual circuit is a logical connection created between two data terminal equipment (DTE) devices across a Frame Relay packet-switched network (PSN).
Virtual circuits provide a bi-directional communications path from one DTE device to another. They are uniquely identified by a data link connection identifier (DLCI).
A virtual circuit can pass through any number of intermediate data circuit-terminating equipment (DCE) devices (switches) located within the Frame Relay PSN. A number of virtual circuits can be multiplexed into a single physical circuit for transmission across the network.
Frame Relay virtual circuits fall into two categories:
• Switched virtual circuit (SVC)
• Permanent virtual circuit (PVC)
Frame Relay Switched Virtual Circuits (SVCs)
A switched virtual circuit (SVC) is one of the two types of virtual circuits used in Frame Relay implementations. SVCs are temporary connections that are used when there is only sporadic data transfer between DTE devices across the Frame Relay network.
A communication session across an SVC consists of four operational states:
Call setup -- In this state, the virtual circuit between two Frame Relay DTE devices are established.
Data transfer -- In this state, data is being transmitted between the DTE devices over the virtual circuit.
Idle -- In this state, the connection between DTE devices is still active, but no data is being transferred.
Call termination -- In this state, the virtual circuit between DTE devices is terminated.
After the virtual circuit is terminated, the DTE devices must establish a new SVC if there is additional data to be exchanged.
Frame Relay Permanent Virtual Circuits (PVCs)
A permanent virtual circuit (PVC) is one of two types of virtual circuits used in Frame Relay implementations. PVCs are permanently established connections that are used when there is frequent and consistent data transfer between DTE devices across the Frame Relay network.
Communication across a PVC does not require the call setup and termination states that are used with SVCs. PVCs are always in one of the following two operational states:
Data transfer -- In this state, data is being transmitted between the DTE devices over the virtual circuit.
Idle -- In this state, the connection between DTE devices is active, but no data is being transferred.
DTE devices can begin transferring data whenever they are ready because the circuit is permanently established.
Frame Relay Data Link Connection Identifier (DLCI)
Frame Relay virtual circuits are identified by data link connection identifiers (DLCIs). DLCI values are typically assigned by the Frame Relay service provider (for example, the Telephone Company).
Frame Relay DLCIs have local significance. That is, the values themselves are not unique in the Frame Relay WAN. Two DTE devices connected by a virtual circuit might use a different DLCI value to refer to the same connection.
The following figure shows how a single virtual circuit might be assigned a different DLCI value on each end of the connection:
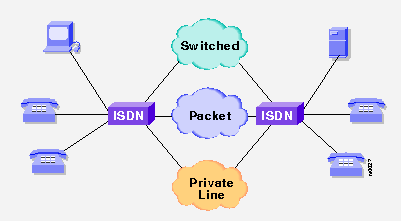
Integrated Services Digital Network (ISDN) Overview
Integrated Services Digital Network (ISDN) refers to a set of communication protocols proposed by telephone companies to permit telephone networks to carry data, voice, and other source material.
In general, ISDN provides a set of digital services that concurrently deliver voice, data, text, graphics, music, video, and information to end users. ISDN was developed to permit access over existing telephone systems.
ISDN services are offered by many carriers under tariff. ISDN is generally viewed as an alternative to Frame Relay and T1 wide-area telephone services (WATS).
In practical terms, ISDN has evolved into one of the leading technologies for facilitating telecommuting arrangements and internetworking small, remote offices into corporate campuses.
The following figure illustrates a conceptual ISDN environment:
ISDN Standards
ISDN is addressed by a suite of ITU-T standards, spanning the physical, data link, and network layers of the seven-layer OSI networking model:
Physical layer -- The ISDN Basic Rate Interface (BRI) physical layer specification is defined in International Telecommunication Union Telecommunication Standardisation Sector (ITU-T) I.430. The ISDN Primary Rate Interface (PRI) physical layer specification is defined in ITU-T I.431.
Data link layer -- The ISDN data link layer specification is based on Link Access Procedure on the D channel (LAPD) and is formally specified in ITU-T Q.920 and ITU-T Q.921.
Network layer -- The ISDN network layer is defined in ITU-T I.450 (also known as ITU-T Q.930) and ITU-T I.451 (also known as ITU-T Q.931). Together these two standards specify user-to-user, circuit-switched, and packet-switched connections.
ISDN Applications
ISDN applications require bandwidth. Typical ISDN applications and implementations include high-speed image applications (such as Group IV facsimile), high-speed file transfer, video conferencing, and multiple links into homes of telecommuters.
ISDN Network Components
ISDN network components fall into three principal categories:
• ISDN terminal equipment
• ISDN termination devices
• ISDN reference points
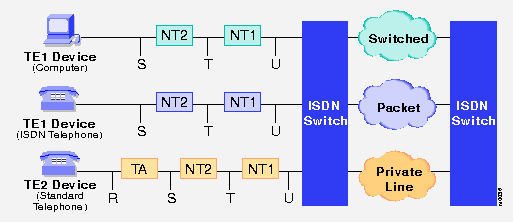
ISDN Terminal Equipment
ISDN specifies two basic terminal equipment types:
Terminal Equipment Type 1 (TE1) -- A TE1 is a specialised ISDN terminal, including computer equipment or telephones. It is used to connect to ISDN through a four-wire, twisted-pair digital link.
Terminal Equipment Type 2 (TE2) -- A TE2 is a non-ISDN terminal such as data terminal equipment (DTE) that predates the ISDN standards. A TE2 connects to ISDN through a terminal adapter (TA). An ISDN TA can be either a standalone device or a board inside the TE2.
ISDN Network Termination Devices
ISDN specifies a type of intermediate equipment called a network termination (NT) device. NTs connect the four-wire subscriber wiring to two-wire local loops. There are three supported NT types:
NT Type 1 (NT1) device -- An NT1 device is treated as customer premises equipment (CPE) in North America, but is provided by carriers elsewhere.
NT Type 2 (NT2) device -- An NT2 device is typically found in digital private branch exchanges (PBXs). An NT2 performs Layer 2 and 3 protocol functions and concentration services.
NT Type 1/2 (NT1/2) device -- An NT1/2 device provides combined functions of separate NT1 and NT2 devices. An NT1/2 is compatible with NT1 and NT2 devices, and is used to replace separate NT1 and NT2 devices.
ISDN Reference Points
ISDN reference points define logical interfaces. Four reference points are defined in ISDN:
R reference point -- The R reference point defines the reference point between non-ISDN equipment and a TA.
S reference point -- The S reference point defines the reference point between user terminals and an NT2.
T reference point -- The T reference point defines the reference point between NT1 and NT2 devices.
U reference point -- The U reference point defines the reference point between NT1 devices and line-termination equipment in a carrier network. (This is only in North America, where the NT1 function is not provided by the carrier network.)
The following figure illustrates the various devices and reference points found in ISDN implementations, as well as their relationship to the ISDN networks they support:
Dedicated WAN services:
High-Level Data Link Control (HDLC) Overview
The High-Level Data Link Control (HDLC) protocol is a popular ISO-standard, bit-oriented, link layer protocol. HDLC was derived from SDLC and specifies an encapsulation method of data on synchronous serial data links.
In general, HDLC is very similar to SDLC. However, there are several differences. HDLC supports a 32-bit checksum, does not support the loop or hub go-ahead configurations supported by SDLC, and supports three transfer modes. SDLC supports only one transfer mode.
The transfer modes supported by HDLC follow:
Normal response mode -- The normal response mode (NRM) is the transfer mode implemented with SDLC. Under NRM, secondaries cannot communicate with a primary until the primary gives permission.
Asynchronous response mode -- The asynchronous response mode (ARM) allows secondaries to initiate communication with a primary without explicit permission.
Asynchronous balanced mode -- The asynchronous balanced mode (ABM) transfer mode introduced the concept of the combined node. A combined node can act as a primary or secondary station. All ABM communication is between multiple combined nodes. Any combined stations can initiate data transmission without permission.
HDLC SUBSET USES
NRM
(Normal Response Mode) . Multipoint networks that typically useSDLC.
LAP
(Link Access Procedure). Early X.25 implementations.LAPB
(Link Access Procedure, Balanced. Current X.25 implementations.LAPD
(Link Access Procedure for the ISDN. ISDN D channel and Frame Relay.D channel).
LAPM
(Link Access Procedure for Modems). Error-correcting modems (specified as partof V.42.
Point-to-Point Protocol (PPP) Overview
The Point-to-Point Protocol (PPP) is generally viewed as the successor to the Serial Line IP (SLIP) protocol. PPP provides router-to-router and host-to-network connections over both synchronous and asynchronous circuits.
PPP emerged in the late 1980s in response to a lack of encapsulation protocols for the Internet that was blocking growth of serial-line access. PPP was basically created to solve remote Internet connectivity problems. PPP supports a number of network layer protocols, including
Novell IPX and DECnet.
The following figure illustrates a generalised view of a PPP environment:
PPP Standards
PPP is defined using a number of International Organisation for Standardisation (ISO) standards:
• PPP uses the principles, terminology, and frame structure of the ISO HDLC procedures (ISO 3309-1979), as modified by ISO 3309:1984/PDAD1
"Addendum 1: Start/stop transmission."
• ISO 3309-1979 specifies the HDLC frame structure for synchronous environments.
• ISO 3309:1984/PDAD1 specifies proposed modifications to ISO 3309-1979 to permit asynchronous use.
• ISO 4335-1979 and ISO 4335-1979/Addendum 1-1979 specify control procedures.
PPP Hardware
PPP physical connections permit operation across any DTE/DCE interface, but require a duplex circuit that can operate in either asynchronous or synchronous bit-serial mode. PPP physical connection requirements do not impose any restrictions regarding transmission rate.
Examples of supported physical interfaces include EIA/TIA-232-C, EIA/TIA-422, EIA/TIA-423, and V.35.
PPP Operation
PPP datagram transmission employs three key components to provide effective data transmission:
Encapsulation -- PPP supports the High-Level Data Link Control (HDLC) protocol to provide encapsulation.
Link Control Protocol (LCP) -- An extensible LCP is used to establish, configure, and test the data link connection.
Network Control Protocols (NCPs) -- A family of NCPs are used to establish and configure different network layer protocols.
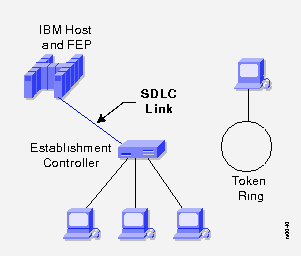
Synchronous Data Link Control (SDLC) Overview
The Synchronous Data Link Control (SDLC) protocol is a bit-synchronous data-link layer protocol developed by IBM Corp.
SDLC was developed by IBM during the mid-1970s for use in Systems Network Architecture (SNA) environments. Subsequent to the implementation of SDLC by IBM, SDLC formed the basis for numerous similar protocols, including HDLC and LAPB.
In general, bit-synchronous protocols have been successful because they are more efficient, more flexible, and in some cases faster than other technologies. SDLC is the primary SNA link layer protocol for wide-area network (WAN) links.
The following figure illustrates the relative position of SDLC links within the context of an SNA WAN environment:
Related Standards
SDLC was modified by the International Organisation for Standardisation (ISO) to create the High-Level Data Link Control (HDLC) protocol.
HDLC was subsequently modified by the International Telecommunication Union Telecommunication Standardisation Sector (ITU-T) to create Link Access Procedure (LAP) and then Link Access Procedure, Balanced (LAPB).
HDLC was eventually modified by the Institute of Electrical and Electronic Engineers (IEEE) to create the IEEE 802.2 specification.
SDLC Environments
SDLC supports a range of link types and topologies, including the following:
• Point-to-point and multipoint links
• Bounded and unbounded media
• Half-duplex and full-duplex transmission facilities
• Circuit- and packet-switched networks
Link Access Procedure, Balanced (LAPB) Overview
The Link Access Procedure, Balanced (LAPB) protocol emerged as the ITU-T X.25 version of a bit-oriented data link protocol. LAPB is integrated into the X.25 protocol stack and shares the same frame format, frame types, and field functions as SDLC and HDLC.
Link Access Procedure, Balanced (LAPB) is a data link layer protocol that manages communication and packet framing between DTE and DCE devices. LAPB is a bit-oriented protocol that ensures that frames are correctly ordered and error-free.
LAPB Frame Types
There are three types of LAPB frames:
Information frame (I-frame) -- These frames carry upper-layer information and some control information. Their functions include sequencing, flow control, and error detection and recovery. I-frames carry send and receive sequence numbers.
Supervisory frame (S-frame) -- These frames carry control information. Their functions include requesting and suspending transmissions, reporting on status, and acknowledging the receipt of I-frames. S-frames carry only receive sequence numbers.
Unnumbered frame (U-frame) -- These frames carry control information. Their functions include link setup and disconnection, and error reporting. U-frames carry no sequence numbers.
LAPB Operation
LAPB is restricted to the ABM transfer mode. With LAPB, circuits can be established by either the data terminal equipment (DTE) or the data circuit-terminating equipment (DCE). Stations initiating calls are determined to be primaries. Responding stations are secondaries.
7) Log into a router in both user and privileged modes.
You configure Cisco routers from the user interface that runs on the router console or terminal. You can also configure Cisco routers using remote access. Cisco Internetwork Operating System (Cisco IOS) software provides a command interpreter called EXEC. EXEC interprets the commands you type and carries out the corresponding operations. You must log in to the router before you can enter an EXEC command.
For security purposes, the EXEC has two levels of access to commands: user mode and privileged mode.
Example
Router con0 is now available
Press RETURN to get started.
User Access Verification
Password:
Router>
User-mode promptRouter> enable
Password:
Router# disable
Router>
Router> exit
8) Use the context-sensitive help facility.
Router# clok
Translating "CLOK"
% Unknown command or computer name, or unable to find computer address
Router# cl?
clear clock
Router# clock
% Incomplete command.
Router# clock ?
set Set the time and date
Router# clock set ?
% Incomplete command.
Router# clock set ?
Current Time (hh:mm:ss)
Symbolic translation
Keyword compression Command prompting
Last command recall <Crtl><P> Syntax checking
(^) Indicate error in syntax.
(?) To reveal additional arguments to commands.
9) Use the command history and editing features.
<Crtl><P> or Up arrow - Last (previous) command line
<Crtl><N> or Down arrow - More recent command recall
Router> show history - Show command buffer
Router> terminal history size number-of-lines - Set command buffer size
Router> terminal no editing - Disable advanced editing features
Router> terminal editing - Reenable advanced editing
<Tab> - Entry completion
<Crtl><Z> - Backs you out of configuration mode
Automatic scrolling of long lines.
<Crtl><A> - Move to the beginning of the command line.
<Crtl><E> - Move to the end of the command line.
<Esc><B> - Move back one word.
<Crtl><F> - Move forward one character
<Crtl><B> - Move back one character.
<Esc><F> - Move forward one word.
10) Examine router elements (RAM, ROM, CDP, show).
Internal Configuration Components
Internal configuration components are as follows:
RAM/DRAM – Stores routing tables, ARP cache, fast-switching cache, packet buffering (shared RAM), and packet hold queues. RAM also provides temporary and/or running memory for the router’s configuration file while the router is powered on. RAM content is lost when you power down or restart.
NVRAM – Non-volatile RAM stores the router’s backup configuration file. NVRAM content is retained when you power down or restart.
Flash – Erasable, reprogrammable ROM. Flash memory holds the operating system image and microcode. Having Flash memory allows you to update software without removing and replacing chips on the processor. Flash content is retained when you power down or restart. Multiple copies of IOS can be stored in flash memory.
ROM – Contains power on diagnostics, a bootstrap program, and operating system software. To perform software upgrades, remove and replace pluggable chips on the CPU.
Interfaces – Network connections through which packets enter and exit the router. Interfaces
are on the motherboard or on separate interface modules.
Router Modes
Whether accessed from the console or by a Telnet session through an auxiliary port, the router can be replaced in several modes. Each mode provides different functions:
Router Status Commands
Random Access Memory (RAM)
Internetwork Operating System - Router# show version
Programs - Router# show processes CPU/show protocols
Active Configuration File - Router# sho running-config/write term
Tables and Buffers - Router# sho mem/sho stacks/sho buffers
Non Volatile Random Access Memory (NVRAM)
Backup Configuration File - Router# show startup-config/sho config.
Flash
Operating Systems - Router# show flash.
Interfaces - Router# sho interfaces.
Console privileged EXEC mode - Router# enable.
Auxiliary virtual terminal port - Telnet
show version - Displays the configuration of the system hardware, the software version , the names and sources of configuration files, and the boot images.
show processes - Display information about the active processes.
show protocols - Displays the configured protocols. This command shows the status of any configured Layer 3 (network) protocol.
show mem - Shows statistics about the router’s memory, including memory free pool statistics.
show stacks - Monitors the stack use of processes and interrupt routines and displays the reason for the last system reboot.
show buffers - Provides statistics for the buffer pools on the network server.
show flash - Shows information about the Flash memory device.
show running-config (write term on Cisco IOS Release 10.3 or earlier) - Displays the active configuration file.
show startup-config (show config on Cisco IOS Release 10.3 or earlier) - Displays the backup configuration file.
show interfaces - Displays statistics for all interfaces configured on the router.
Cisco Discovery Protocol
Cisco Discovery Protocol (CDP) provides a single proprietary command that enables network administrators to access a summary of the multiple protocols and address configured on other directly connected routers.
CDP runs over a data link layer connecting lower physical media and upper-network-layer protocols. Because CDP operates at this level, two or more CDP devices that support different network-layer protocols can learn about each other.
Physical media supporting the Subnetwork Access Protocol (SNAP) connect CDP devices. These can include all LANs, Frame Relay and SMDS WANs, and ATM networks.
When a Cisco device running Cisco IOS Release 10.3 and later boots up, CDP starts up by default. CDP can then automatically discover neighbouring Cisco devices running CDP, regardless of which protocol suite or suites are running.
Discovered devices extend those having TCP/IP. CDP will discover directly connected Cisco devices regardless of which protocol suite they run.
Once CDP discovers a device, it can display any of the various upper layer-layer protocol address entries used on the discovered device’s port – IPX, AppleTalk Datagram Delivery Protocol (DDP), DECnet CLNS, and others.
Show CDP Neighbour Entries
Each router running CDP exchanges information about any protocol entries it knows with its neighbours. The administrator can display the results of this CDP information exchange on a console connected to a router configured to run CDP on its interfaces.
The network manager uses a show command to display information about the networks directly connected to the router. Frames formed by CDP provide information about each CDP neighbour device. Value include the following:
CDP Configuration Example
routerA (config-if)# cdp enable
routerA# show cdp interface
Serial0 is up, line protocol is up, encapsulation is Frame Relay
Serial CDP packets every 60 seconds
Holdtime is 180 seconds
Ethernet0 is up, line protocol is up, encapsulation is ARPA
Sending CDP packets every 60 seconds
Holdtime is 180 seconds
CDP begins automatically upon a device’s system startup. The CDP function normally starts by default when a Cisco product boots up with Cisco IOS Release 10.3 or later.
Although CDP runs by default, you must explicitly enable it on the device’s interface using the command cdp enable. For example, the graphic shows the cdp enable command that you use on the E0 and S0 interfaces on the router named router A.
This command begins CDP’s dynamic discovery function on the device’s interfaces. Advertisement and discovery using CDP involves data-link frame exchanges. Only directly connected neighbours exchange CDP frames.
A router caches any information it receives from its CDP neighbours. If a subsequent CDP frame indicates that any of the information about a neighbour has changed, the router discards the older information in favour of the newer information.
Use the command show cdp interface to display the values of the CDP timers, the interface status, and the encapsulation used by the CDP for its advertisement and discovery frame transmission.
Default values for timers set the frequency between CDP updates and for ageing CDP entries. These timers are set automatically at 60 seconds and 180 seconds, respectively. If the device receives a more recent update or if this holdtime value expires, the device must discard the CDP entry.
Showing CDP Entries for a Device
Device ID: routerB
Entry address(es):
IP address: 198.92.68.18
CLNS address: 490001.1111.1111.1111.00
Appletalk address: 10.1
Platform: AGS, Capabilities: Router Trans-Bridge
Interface: Ethernet0, Port ID (outgoing port): Ethernet0
Holdtime : 155 sec
Version:
IOS ™ GS Software (GS3), 11.2(13337) [asastry 161]
Copyright © 1986-1996 by cisco Systems, Inc.
Compiled Tue 14-May-96 1:04
Use the command show cdp entry {device name} to display a single cached CDP entry.
Notice that the output from this command includes all the Layer 3 addresses present in the neighbour router B – an administrator can see the IP, CLNS, and DECnet network addresses of the targeted CDP neighbour with the single command entry on router A.
The holdtime value indicates how long ago the CDP frame with this information. The command includes abbreviated version information about router B.
CDP was designed and implemented as a very simple, low-overhead protocol. A CDP frame can be as small as 80 octets, mostly made up of the ASCII strings that represent information like that shown.
Showing CDP Neighbours
routerA#show cdp neighbors
Capability Codes: R – Router, T – Trans Bridge,
B – Source Route Bridge,
S – Switch, H – Host, I – IGMP
Device ID Local Intrfce Holdtme Capability Platform Port ID
routerB.cisco.com Eth 0 151 R T AGS Eth 0
routerB.cisco.com Ser 0 165 R T AGS Ser 0
routerA#show cdp neighbors detail
Device ID: routerB.cisco.com
Entry address(es):
IP address: 198.92.68.18
CLNS address: 490001.1111.1111.1111.00
Appletalk address: 10.1
Platform: AGS, Capabilities: Router Trans-Bridge
Interface: Ethernet0, Port ID (outgoing port): Ethernet0
Holdtime : 143 sec
Use the command show cdp neighbors to display the CDP updates received on the local router. Notice that for each local port, the display shows the following:
To display this information as well as information like that from show cdp entry, the administrator uses the optional show cdp neighbors detail.
11) Manage configuration files from the privileged exec mode.
Working with 11.x Config Files
Router configuration information can be generated by several means.
The privileged EXEC configure command can be used to configure from either a virtual (remote) terminal or the console terminal, allowing you to enter changes to an existing configuration at any time. The privileged EXEC configure command can also be used to load a configuration from a network TFTP server, allowing you to maintain and store configuration information at a central site.
Configuration command summary:
Using a TFTP server
A current copy of the configuration can be stored on a TFTP server. Use the copy running-config tftp command to store the current configuration in RAM on a network TFTP server.
You can configure the router by retrieving the configuration file stored on one of your network servers. To do so, complete the following tasks:
Step 1 Enter configuration mode by entering the copy tftp running-config command.
Step 2 At the system prompt, select a host or network configuration file. The network configuration file contains commands that apply to all routers and the terminal servers on the network. The host configuration file contains commands that apply to one router in particular.
Step 3 At the system prompt, enter the optional IP address of the remote host from which you are retrieving the configuration file. In this example, the router is configured from the TFTP server at IP address 131.108.2.155. At the system prompt, enter the name of the configuration file or accept the default name. The filename convention is UNIX-based. The default filename is hostname-config for the host file and network-config for the network configuration file. In the DOS environment, the server filenames are limited to eight characters plus a three-character extension (for example, router.cfg). Confirm the configuration filename and the server address that the system supplies.
Using NVRAM with Release 11.x
Router# configure memory
Router#
Router# erase startup-config
Router#
Router# copy running-config startup
Using 5057 out of 32768 bytes
!
enable-password san-fran
!
interface Ethernet 0
ip address 131.108.100.5 255.255.255.0
!
-- More --
These commands manage the contents of NVRAM:
12) Control router passwords, identification, and banner.
Password Configuration
Router(config)# line console 0
Router(config)# login
Router(config-line)# password cisco
Router(config)# line vty 0 4
Router(config-line)# login
Router(config-line)# password cisco
Router(config)# enable-password san-fran
Router(config)# service password-encryption
(set passwords here)
Router(config)# no service password-encryption
The line console 0 command establishes password on the console terminal.
The line vty 0 4 command establishes password protection on incoming Telnet sessions.
The enable-password command restricts access to the privileged EXEC mode.
The enable-secret password from the System Configuration Dialog to setup global parameters uses a Cisco-proprietary encryption process to alter the password character string.
Password can be further protected from display through the use of the service password-encryption command. The encryption algorithm does not match the Data Encryption Standard (DES).
Configuring Router Identification
Router(config)# hostname Tokyo
Tokyo#
Tokyo(config)# banner motd #
Welcome to router Tokyo
Accounting Department
Third Floor
#
Tokyo(config)# interface e 0
Tokyo(config-if)# description Engineering LAN, Bldg. 18
The configuration of network devices determines the network’s behaviour. To manage device configurations, you need to list and compare configuration files on running devices, store configuration files on network servers for shared access, and perform software installations and upgrades.
One of the first basic tasks is to name your router. The name of the router is considered to be the host name and is the name displayed by the system prompt. If no name is configured, the system default router name is Router. You can name the router in global configuration mode. In the example shown, the router name is set to Tokyo.
You can configure a message-of-the-day banner to be displayed on all connected terminals. This banner is displayed at login and is useful for conveying messages that affect all network users, such as impending system shutdowns. To configure this message, use the banner motd command in global configuration mode.
13) Describe the router’s startup sequence and load sources & Identify the main Cisco IOS commands for router start-up.
An Overview of System Startup
The startup routines for Cisco IOS software have the goal of starting router operations. The router must deliver reliable performance connecting the user networks it was configured to serve. To do this, the startup routines must:
The router will make sure that it comes up with tested hardware. When a Cisco router powers up, it performs a power-on self-test. During this self-test, the router executes diagnostics from ROM on all modules. These diagnostics verify the basic operation of the CPU, memory, and interface circuitry.
After verifying the hardware functions, the router proceeds with software initialisation. Some startup routines act as fallback operations that are able to perform the router startup should other routines be unable to do so. This flexibility allows Cisco IOS software to start up in a variety of initial situations.
Startup Sequence
After the power-up self test on the router, the following events occur when the router initialises:
Setup is not intended as the mode for entering complex protocol features in the router. Use setup to bring up minimal configuration. Instead of setup, network administrators use various config-mode commands for most router configuration tasks.
Commands Relating to Startup
Router# show start-up config (show config)*
Router# show running-config (write term)*
Router# erase startup-config (write erase)*
Router# reload
Router# setup
*Use these commands for routers running Release 10.3 or earlier
14) Check an initial configuration using the setup command
Setup: The System Configuration Dialog
#setup
--- System Configuration Dialog ---
At any point you may enter a question mark ‘?’ for help.
Use ctrl-c to abort configuration dialog at any prompt.
Default settings are in square brackets ‘[]’.
Continue with configuration dialog? [yes]:
First, would you like to see the current interface summary? [yes]:
Interface IP-Address OK? Method Status Protocol
TokenRing0 unassigned NO not set down down
Ethernet0 unassigned NO not set down down
Serial0 unassigned NO not set down down
Fddi0 unassigned NO not set down down
One routine for initial configuration is the setup mode. The primary purpose of the setup mode is to rapidly bring up a minimal-feature configuration for any router that cannot find its configuration from some other source.
For many of the prompts in the system configuration dialog of the setup command facility, default answers appear in square brackets ([ ]) following the question. Pressing the Return key allows you to use defaults. If the system was previously configured, the defaults that appear are the currently configured values. If you are configuring the system for the first time, the factory defaults are provided. If there is no factory default, as in the case of passwords, nothing is displayed after the question mark (?).
At this point, you can choose not to continue with system configuration dialog and can exit by entering No at the prompt. To begin the initial configuration process, enter Yes. You can press Control-C to terminate the process and start over at any time. When you are using the command form of setup (Router# setup), Control-C returns you to the privileged EXEC prompt (Router#).
If a "—More—" prompt appears, press the space bar to continue.
Setup Global Parameters
Configuring global parameters:
Enter host name [Router]:
The enable secret password is a one-way cryptographic secret used
Instead of the enable password when it exists.
Enter enable secret [<Use current secret>]:
Enter enable password [san-fran]:
% Please choose a password that is different from the enable secret
Enter enable password [san-fran]:
Enter virtual terminal password [san-fran]:
Configure SNMP Network Management? [no]:
Configure IP? [yes]:
Configure IGRP routing? [yes]:
Your IGRP autonomous system number [1]: 200
Configure DECnet? [no]:
Configure XNS? [no]:
Configure Novell? [no]: yes
Configure Apollo? [no]:
Configure AppleTalk? [no]: yes
Multizone networks? [no]: yes
Configure Vines? [no]:
Configure bridging [no]:
You are prompted for global parameters at the console. You use the configuration values you have determined for your router to enter the global parameters at the prompts.
The first global parameter allows you to set the router host name. This host name will precede the Cisco IOS prompts for all configuration modes. At initial configuration, the router name default is shown between the square brackets as [Router].
Use the next global parameters shown to set various passwords used on the router.
You must enter an enable secret password. When you enter a string of password characters for the prompt to "Enter enable secret," the characters are processed by Cisco-proprietary encryption. This can enhance the security of the password string. Whenever anyone lists the contents of the router configuration file, this enable password appears as a meaningless of characters. Setup recommends, but does not require that the enable password be different form the enable secret.
You are prompted for global parameters at the console. You use the configuration values you have determined for your route to enter the global parameters at the prompts.
Setup Interface Parameters
Configuring interface parameters:
Configuring interface TokenRing0:
Is this interface in use? [yes]:
Tokenring ring speed (4 or 16)? [16]:
Configure IP on this interface? [no]: yes
IP address for this interface: 172.16.92.67
Number of bits in subnet field [0]:
Class B network is 172.16.0.0, 0 subnet bits; mask is 255.255.0.0
Configure Novell on this interface? [no]: yes
Novell network number [1]:
Configuring interface Serial0:
Is this interface in use? [yes]:
Configure IP on this interface? [yes]:
Configure IP unnumbered on this interface? [no]:
IP address for this interface: 172.16.0.0, 0 subnet bits; mask is 255.255.0.0
Configure Novell on this interface? [yes]: no
Configuring interface Serial1:
Is this interface in use? [yes]: no
You are prompted for parameters for each installed interface. You use the configuration values you have determined for your interface to enter the interface parameters at the prompts.
Setup Script Review and Use
The following configuration command script was created:
hostname router
enable secret 5 $1$g722$18&7$5d
enable password san-fran
enable password san-fran
line vty 0 4
password san-fran
snmp-server community
!
ip routing
no decnet routing
no xns routing
novell routing
no apollo routing
appletalk routing
no clns routing
no vines
no bridge
no mop enabled
--More--
interface TokenRing0
ip address 172.16.92.67 255.255.0.0
novell network 1
no mop enabled
!
interface Serial0
ip address 172.16.97.67 255.255.0.0
interface Serial1
shutdown
!
router igrp 200
network 172.16.0.0
!
end
Use this configuration? [yes/no]:yes
[OK]
Use the enabled mode ‘configure’ command to
modify this configuration.
When you complete the configuration process for all installed interfaces on your router, the setup command facility presents the configuration command script that was created.
The setup command facility asks you whether you want to use this configuration. If you answer Yes, the configuration is executed and saved to NVRAM. If you answer No, the configuration is not saved and the process begins again. There is no default for this prompt; you must answer either Yes or No.
Once you have answered Yes to this last question, your system is ready to use. If you want to modify the configuration you have just established, you must configure manually.
The script tells you to use configuration mode to modify the command after setup has been used. The script file generated by setup generated by setup is additive; you can turn on features with setup, but you cannot turn them off. Also setup does not support many of the advanced features of the router or those features that require a more complex configuration.
15) Copy and manipulate configuration files.
16) List the commands to load Cisco IOS software from: flash memory, tftp server, or ROM.
Locating the Cisco IOS Software
Configuration Registers
Registers in NVRAM for modifying fundamental Cisco IOS software
Identifies where to boot Cisco IOS image (for example, use config-mode commands)
Router# configure terminal
Router(config)# boot system flash IOS_filename
Router(config)# boot system tftp IOS_filename tftp_address
Router(config)# boot system rom
[Ctrl-Z]
Router(config)# copy running-config startup-config
Boot system commands not found in NVRAM
Get default Cisco IOS software from Flash
Flash memory empty
Get default Cisco IOS software from TFTP server
Configuration Register Values
Router# configure terminal
Router(config)# config-register 0x10F
[Crtl-Z]
Configuration-Register Value
Meaning0x0 Use ROM monitor mode
(Manually boot using the b command
0x1 Automatically boot from ROM
(default if router has no flash)
0x2 to 0xF Examine NVRAM for boot system
commands (0x2 default if router has flash)
The order in which the router looks for system bootstrap information depends on the boot field setting in the configuration register. You can damage the default configuration register setting the enabled config-mode command config-register. Use a hexadecimal number as the argument to this command. In this example, the configuration register is set so that the router will examine the startup file in NVRAM for boot system options. The configuration register is a 16-bit register in NVRAM. The lowest four bits of the configuration register (bits 3, 2, 1, and 0) form the boot field.
To change the boot field and leave all other bits set to their default values, follow these guidelines:
To check the boot field setting, for example, to verify the config-register command, you must use the show version command.
Bootstrap Options in Software
Flash
Router# configure terminal
Router(config)# boot system flash genew-image
[Ctrl-Z]
Router# copy running-config startup-config
Network
Router# configure terminal
Router(config)# boot system tftp test.exe 172.16.13.111
[Ctrl-Z]
Router# copy running-config startup-config
ROM
Router# configure terminal
Router(config)# boot system rom
[Ctrl-Z]
Router# copy running-config startup-config
These examples show how you can enter multiple boot system commands to specify the fallback sequence for booting Cisco IOS software. The three examples show boot system entries that specify that a Cisco IOS image will load first from Flash memory, next from a network server, and finally from ROM.
Using this approach you can copy a system image without changing electrically erasable programmable read-only memory (EEPROM). Information stored in Flash memory is not vulnerable to network failures that can occur when loading system images from TFTP servers.
To provide for a backup in case flash memory becomes corrupted, you can specify that a system image should then be loaded from a TFTP server.
If both Flash memory is corrupted and the network server fails to load the image, booting from ROM is the final bootstrap option in software. However, the system image in ROM will likely be a subset of Cisco IOS software, lacking the protocols, features and configurations of full Cisco IOS software. It may also be an older version of Cisco IOS software if you have updated software since you purchased the router.
The command copy running-config startup-config saves the command in NVRAM. The router will execute the boot system commands as needed in the order in which they were originally entered into configuration mode.
17) Prepare to backup, upgrade, and load a backup Cisco IOS software image.
Creating a Software Image Backup
Router# show flash
4096k bytes of flash memory on embedded flash (in xx).
file offset length names
0 0x40 1204637 xk09140z
[903848/2097152 bytes free]
Router# copy flash tftp
IP address of remote host [255.255.255.255]? 172.16.13.111
filename to write on tftp host? C4500-1
Writing C4500-I
!!!!!!!!!!!!!!!!!!!!!!!!!!!!!!!!!!!!!!!!!!!!!!!!successful tftp write.
Router#
Upgrading the Image from the Net
Router# copy tftp flash
IP address or name of remote host [255.255.255.255]? 172.16.13.111
Name of tftp filename to copy into flash memory? c4500-ajm-m
Copy C4500-AJ-M from 172.16.13.111 into flash memory? [confirm] <Return>
xxxxxxxx bytes available for writing without erasure.
Erase flash before writing? [confirm] <Return>
Clearing and initializing flash memory (please wait)####...##
Loading from 172.16.13.111: !!!!!!!!!!!!!!!!!!!!!!!!!!!!!!!!!!!!!
!!!!!!!!!!!!!(text omitted) [OK – 324572/524212 bytes]
Verifying checksum...
vvvvvvvvvvvvvvvvvvvvvvvvvvvvvvvvvvvvvvvvvvvvvvvvvvvvvvvvvvvvvvvvvvvvvvvvv
vvvvvv(test omitted)
Flash verification successful. Length = 1804637, checksum = 0xA5D3
Loading a Software Image Backup
Router# copy tftp flash
IP address or name of remote host [255.255.255.255]? 172.16.13.111
Name of tftp filename to copy into flash []? c4500-I
File C4500-I already exists; it will be invalidated!
Copy C4500-I from 172.16.13.111 into flash memory? [confirm] <Returns>
xxxxxxxx bytes available for writing without erasure.
erase flash before writing? [confirm] <Return>
Clearing and initializing flash memory (please wait)####...##
Loading from 172.16.13.111: !!!!!!!!!!!!!!!!!!!!!!!!!!!!!!!!!!!!!!!
!!!!!!!!!!!!!!!!!(text omitted) [OK – 324572/524212 bytes]
Verifying checksum...
vvvvvvvvvvvvvvvvvvvvvvvvvvvvvvvvvvvvvvvvvvvvvvvvvvvvvvvvvvvvvvvvvvvvvvvvvvvvvvvvv(text omitted)
Flash verification successful. Length = 1204637, checksum = 0x95D9
18) List key internetworking functions of the OSI Network Layer and how they are performed in a router.
19) Describe the two parts of network addressing, then identify the parts in specific protocol address examples.
Two general parts of a Layer 3 address are a Network part and a Node or Host part.
Network address - Path part used by the router
Host/Node address - Specific port or device on the network.
TCP/IP networks represent addresses as 32-bit entities, divided into a network portion and a host portion. The Internet Request For Comments (RFC) 1020 divides the network portion into classes. All classes of specific, Internet-legal network addresses come from a central authority: the Network Information Centre (NIC). The most common of these classes follow:
IP networks typically are subdivided into subnetworks. When an IP address has been subnetted, the network part of the address is described by two elements: the network number, still assigned by the NIC, and the subnetwork number, assigned by the local network administrator.
E.g. 131.108.3.1 (assume subnet mask is 255.255.0.0) - Network = 131.108, Node/Host = 3.1
Novell Internet Packet Exchange (IPX) address - Identifies the IPX network in the first part of the address using an address range of 32 bits to reflect a hexadecimal number. This network number refers to the medium, for example, the Ethernet or Token Ring LAN. For the node address, IPX uses a 48-bit hexadecimal number, usually derived automatically from the MAC address of a LAN interface to the IPX network.
E.g. abadcafe.0000.0c56.de33 - Network = abadcafe, Node/Host = 0000.0c56.de33.
AppleTalk address - Identifies the network in the first part of the address. The 16-bit network numbers are assigned to physical links either individually or in ranges called cable ranges. This approach makes it possible for many network addresses to use the same LAN media. The 8-bit AppleTalk node portion is called the host address. An Apple end station usually acquires this host address dynamically when it boots up onto the network.
E.g. 1000.128 (assume a cable range 1000-1000) - Network = 1000, Node/Host = 128
X.25 address - Within the X.25 protocol suite, the X.121 protocol covers the international numbering plan for public data networks (PDNs). The network portion of the address specifies three or four decimal digits as the Data Network Identification Code (DNIC). This DNIC includes a Data Country Code (DCC). An example is 310 for the United States, followed by the network number 6 for Tymnet - one of the major PDNs. The node address portion is called the network terminal number (NTN). X.25 users usually obtain these NTNs from an authority within the X.25 data network service provider.
E.g. 31060004085551 (X.121) - DNIC = 3106, NTN = 0004085551.
20) List problems that each routing type encounters when dealing with topology changes and describe techniques to reduce the number of these problems.
Distance Vector Concept
Distance vector-based routing algorithms (also known as Bellman-Ford algorithms) pass periodic copies of a routing table from router to router. Regular updates between routers communicate topology changes.
Each router receives a routing table from its direct neighbour. Router B receives information from router A. Router B then adds a distance vector number (such as a number of hops) increasing the distance vector, then passes the routing table to its other neighbour, router C. This step-by-step process occurs in all directions between direct-neighbour routers.
In this way, the algorithm accumulates network distances so it can maintain a database of internetwork topology information. Distance vector algorithms do not allow a router to know the exact topology of an internetwork.
Distance Vector Topology Changes
When the topology in a distance vector protocol internetwork changes, routing table updates must occur. As with the network discovery process, topology change updates proceed step-by-step from router to router.
Distance vector algorithms call for each router to send its entire routing table to each of its adjacent neighbours. Distance vector routing tables include about the total path cost (defined by its metric) and the logical address of the first router on the path to each network it knows about.
When a router receives an update from a neighbouring router, it compares the update to its own routing table. If it learns about a better route (smaller metric) to a network from its neighbour, the router updates its own routing table. In updating its own table, the router adds the cost of reaching the neighbour router path cost reported by the neighbour to establish the new routing table.
Problem:
Routing Loops - Routing Loops can occur if the internetwork’s slow convergence on a new configuration causes inconsistent routing entries.
Counting to infinity - This condition continuously loops packets around the network, despite the fundamental fact that the destination network is down. While the routers are counting to infinity, the invalid information allows a routing loop to exist.
Solution:
Defining a Maximum - Specify a maximum distance vector metric as infinity.
Split Horizon - If you learn a protocol’s route on an interface, do not send information about that route back out that interface.
Route Poisoning - Router keeps an entry for the network down state, allowing time for other routers to recompute for the topology change.
Hold-Down Timers - Routers ignore network update information for some period.
Link-State Concept
The second basic algorithm used for routing is the link-state algorithm.
Link-state-based routing algorithms – also known as shortest path first (SPF) algorithms, maintain a complex database of topology information. Whereas the distance vector algorithm has non-specific information about distant networks and no knowledge of distant routers, a link-state routing algorithm maintains full knowledge of distant routers and how they interconnect.
Link-state routing uses link-state packets (LSPs), a topological database, the SPF algorithm, the resulting SPF tree, and finally, a routing table of paths and ports to each network.
Engineers have implemented this link-state concept in Open Shortest Path First (OSPF) routing. RFC 1583 contains a description of OSPF link-state concepts and operations.
Link-State Network Discovery
Network discovery for link-state routing uses the following processes:
After the routers dynamically discover the details of their internetwork, they can use the routing table switch packet traffic.
Link-State Concerns
There are two link-state concerns:
Routers keep track of their neighbours and the networks they reach through other routing nodes. For link-state routing, memory must hold information from various databases, the topology tree, and the routing table.
Computing the shortest path first Dijkstra’s algorithm requires a processing task proportional to the number of links in the internetwork times the number of routers in the network.
After this initial flooding, link-state routing protocols generally require only internetwork bandwidth to send infrequent or event-triggered LSPs that reflected topology changes.
Problems:
Link-State Updates –
The most complex and critical aspect of link-state routing is making sure that all routers get all the LSPs necessary. Routers with different sets of LSPs will calculate routes based on different topological data. Then routes become unreachable as a result of the disagreement among routers about the link. Here is an example of inconsistent path information:
If LSP distribution to all routers is not done correctly, link-state routing can result in invalid routes.
Scaling up with link-state protocols on very large internetworks can intensify the problem of a faulty LSP distribution.
If one part of the internetwork comes up first with other parts coming up later, the order for sending and receiving LSPs will vary. This variation can alter and impair convergence. Routers might learn about different versions of the topology before they construct their SPF trees and routing tables.
On a large internetwork, parts that update more quickly can cause problems for parts that update more slowly. Routers sending out LSPs cannot assume they will be correctly transported by following existing routing table entries because these entries might not reflect the current topology.
With faulty updates, LSPs can multiply as they propagate through the internetwork, unproductively consuming more and more bandwidth.
Eventually a partition can split the internetwork into a fast updating part and a slow updating part. Then network administrators must troubleshoot the link-state complexities to restore acceptable connectivity.
Solution:
Link-States Mechanism
"Dampen" update frequency
Target link-state updates to multicast
Use link-state area hierarchy for topology
Exchange route summaries at area borders
Use time stamps
Update numbering and counters
Manage partitioning using an area hierarchy
Link-state routing has several techniques for preventing or correcting potential problems arising from resource requirements and LSP distribution.
Comparing Distance Vector Routing to Link-State Routing
You can compare distance-vector routing to link-state routing in several key areas:
21) Explain the services of separate and integrated multiprotocol routing.
In a separate multiprotocol routing environment, the several configured protocols operate like ships in the night (each protocol is not aware of other protocols running on the same router).
E.g. (RIP) and (OSPF). More information read question 20
With an integrated multiprotocol routing environment, the several configured protocols share the results of the integrated routing algorithm. It does the following:
An example of an integrated routing protocol is Enhanced IGRP, which is Cisco proprietary routing protocol that integrates support for IP, AppleTalk, and Novell IPX. Enhanced IGRP uses a distance vector algorithm based on Cisco’s IGRP.
22) Describe the different classes of IP addresses [and subnetting].
Introduction to TCP/IP Addresses
In a TCP/IP environment, end stations communicate seamlessly with servers or other end stations. This occurs because mode using the TCP/IP protocol suite has a unique 32-bit logical address.
Often traffic is forwarded through the internetwork based on the name of an organisation, rather than an individual person or host. If names are used instead of addresses, the names must be translated to the numeric address before the traffic can be delivered. Location of the organisation will dictate the path that the data follows through the internetwork.
Each company listed on the internetwork is seen as a single network that must be reached before an individual host within that company can be contacted. Each company network address has an address; the hosts that populate that network share bits, but each host is identified by the uniqueness of the remaining bits.
IP Addressing
The IP address is 32 bits in length and has two parts:
The address format is known as dotted decimal notation.
The allocation of addresses is managed by a central authority.
IP Addresses Classes
Class A:
N.H.H.HClass B:
N.N.H.HClass C:
N.N.N.HClass D: for multicast
Class E: for research
N = Network number assigned by NIC
H = Host number assigned by network administrator
When IP was first developed, there were no classes of addresses. Now, for ease of administration, the IP addresses are broken up into classes.
There are only 126 Class A address spaces, but each one can contain approximately 16 million hosts. There are 65,534 Class B address spaces with 65,534 hosts each. There are ore than 16 million Class C address spaces possible, but they only have 254 hosts each.
This scheme allows the administrative authority to assign addresses based on the size of the network. The authority designed this system on the assumption that there would be many more small networks than large networks in the networks in the world.
Note
Class D and E addresses are also defined. Class D addresses start at 224.0.0.0 and are used for multicast purposes. Class E addresses start at 240.0.0.0 and are used for experimental purposes.IP address Bit Patterns
The most significant bit pattern determines the class of the address, as well as how many bits make up the network portion of the address.
Recognising Classes in IP Addresses (First Octet Rule)
The first octet rule states that the class of an address can be determined by the numerical value of the first octet.
Once the first octet is applied, the router identifies how many bits it must match to interpret the network portion of the address (based on the standard address class). If there is no further identification of additional bits to use as part of the network address, the router can make a routing decision using this address.
Note
127.0.0.1 is reserved for loopback address.Host address
Each device or interface must have a non-zero host number.
A host address of all ones is reserved for an IP into that network.
A value of zero means "this network" or "the wire itself" (for example, 172.16.0.0). It was also used for IP broadcasts in some early TCP/IP implementations, it usually it is rarely found now.
The routing table contains entries for network or wire addresses; it usually does not contain any information about hosts.
An IP address and subnet address on an interface achieves three purposes:
Subnet Addressing
From the addressing standpoint, subnets are an extension of the network number. Network administrators decide the size of subnets based on organisation and growth needs.
Network devices use subnet masks to identify which part of the address is considered network and which remaining part to leave for host addressing.
Subnet Mask
An IP address is 32 bits in size, written as four octets. The subnet mask is 32 bits in size, written as four octets. The layout of the subnet mask field is as follows:
Subnet masks indicate which of the bits in the host field are used to specify different parts (subnets) of a particular network.
Decimal Equivalent of Bits Patterns
Subnet bits come from the high-order bits of the host field. To determine a subnet mask for an address, add up the decimal values of each position that has a 1 in it. For example,
224 = 128 + 64 + 32.
Because the subnet mask is not defined by the octet boundary, but by bits, we need to convert dotted decimal addresses to binary and back into dotted decimal so they can work with these addresses.
Subnet Mask without Subnets
172.16.2.160 10101100 00010000 00000010 10100000
255.255.0.0 11111111 11111111 00000000 00000000
10101100 00010000 00000000 00000000
172 16 0 0
The router extracts the IP destination address from the packet and retrieves the internal subnet mask.
The router performs a logical AND operation to obtain the network number. During the logical AND operation, the host portion of the destination address is removed.
Routing decisions are then based on network number only.
In this example, with no subnetting, the network number "extracted" is 172.16.0.0.
Subnet Mask with Subnets
172.16.2.160 10101100 00010000 00000010 10100000
255.255.0.0 11111111 11111111 11111111 00000000
10101100 00010000 00000010 00000000
172 16
2 0With eight-bit subnetting, the extracted network (subnet) number is 172.16.2.0.
This sample shows more bits turned on, extending the network portion and creating a secondary field extending from the end of the standard mask and using eight of the host bits. This secondary field is the subnet field and is used to represent wires (or subnetworks) inside the networks.
Subnet Planning
Class B Subnet Planning Example
IP Host Address: 172.16.2.120
Subnet Mask: 255.255.255.0
Network Subnet Host
172.16.2.120: 10101100 00010000 00000010 01111001
255.255.255.0/8: 11111111 11111111 11111111 00000000
Subnet: 10101100 00010000 00000010 00000000
172 16 2 0
This network has eight that provide up to 254 subnets and 254 host addresses.
No. Bits Subnet Mask No. Subnets No. Hosts
2 255.255.192.0 2 16,382
3 255.255.224.0 6 8190
4 255.255.240.0 14 4094
5 255.255.248.0 30 2046
6 255.255.252.0 62 1022
7 255.255.254.0 126 510
8 255.255.255.0 254 254
9 255.255.255.128 510 126
10 255.255.255.192 1022 62
11 255.255.255.224 2046 30
12 255.255.255.240 4094 14
13 255.255.255.248 8190 6
14 255.255.255.252 16,382 2
Class C Subnet Planning Example
IP Host Address: 192.168.5.121
Subnet Mask: 255.255.255.248
Network Subnet Host
192.168.5.121: 11000000 10101000 00000101 01111 001
255.255.255.248/5: 11111111 11111111 11111111 11111 000
Subnet: 11001001 11011110 00000101 01111 000
No. Bits Subnet Mask No. Subnets No. Hosts
2 255.255.255.192 2 62
3 255.255.255.224 6 30
4 255.255.255.240 14 14
5 255.255.255.248 30 6
6 255.255.255.252 62 2
23) Configure IP addresses.
IP Address Configuration
Router (config-if) # ip address ip-address subnet-mask
Router# term ip netmask-format
Router(config)# term ip netmask-format
Use the ip address command to establish the logical network address of this interface.
ip address Command Description
ip-address A 32-bit dotted decimal number.
subnet-mask A 32-bit dotted decimal number indicating which bit positions must match; ones indicate positions that much match, and zeros indicate positions that do not match.
Use the term ip netmask-format command to specify the format of network masks for the current session. Format options are:
IP Host Names
Router (config) # ip host name [ tcp-port-number ] address [ address ]…
ip host tokyo 1.0.0.5 2.0.0.8
ip host kyoto 1.0.0.4
24) Verify IP addresses.
Verifying Address configuration
Three command allow you to verify address configuration in your internetwork:
Simple Ping
The ping command sends ICMP echo packets and is supported in both user and privileged EXEC mode. These are the commands that may be returned by the ping test:
Character Definition
! Successful receipt of an echo reply
. Times out waiting for datagram reply
U Destination unreachable error
C Congestion-experienced packet
I Ping interrupted (for example, Ctrl-Shift-6 X)
? Packet type unknown
& Packet Time to Live exceeded
Extended Ping
The extended ping command is supported only privileged EXEC mode.
You can use the extended command mode of the ping command to specify the supported Internet header options. To enter the extended mode, enter Y at the extended commands prompt.
IP Trace
Host names are shown if the addresses are translated dynamically or via static host table entries.
Note:
trace is supported by IP, CLNS, VINES, and AppleTalk.When the trace reaches the target destination, an asterisk (*) is reported at the display. This normally is caused by the receipt of a port-unreachable packet and the time out in response to the probe packet.
Others include:
!H - The probe was received by the router, but not forwarded, usually due to an access list.
P - The protocol was unreachable.
N - The network was unreachable.
* - Time out.
25) Prepare the initial configuration of your router and enable IP.
Initial Router Configuration
Instructions: Perform the initial configuration of your router. Use the System Configuration Dialog to create an initial configuration for the to create an initial configuration for the router. This includes configuring the host name, password, and IP addresses of the interfaces. When done, save this configuration in non-volatile memory.
Example:
Step 1. Initiate the System Configuration Dialog:
The router should automatically enter setup mode. If the
router# prompt appears, enter the setup command.Step 2. Use the System Configuration Dialog to configure the following:
Step 3. Configure all the interfaces on your router as shown in the Initial Configuration Data Sheet and address table.
Remember to include any required platform-specific and serial-line specific parameters. Do not configure IP unnumbered on serial interfaces.
Step 4.
Check the configuration script generated by the System Configuration Dialog; if it looks correct, save the configuration by entering yes at the prompt.Step 5. Enter enable mode.
Step 6. Use the configure terminal command to set the console password to cisco.
Step 7. Enter the config-interface environment and enable CDP on each of your router interfaces by entering the command cdp enable.
Step 8. Quit the session and log in again. The router should ask for a password.
Step 9. After testing the passwords, save the configuration in NVRAM
26) Add the RIP routing protocol to your configuration.
RIP Overview
The RIP protocol was originally specified in RFC 1058
Key characteristics of RIP include the following:
RIP Configuration
Router (config-if) # router rip
Router (config-router) # network network-number
The router rip command selects RIP as the routing protocol.
The network command assigns a NIC-based address to which the router is directly connected. The routing process will associate interfaces with the proper addresses and will begin packet processing on the specified networks.
27) Add the IGRP routing protocol to your configuration.
IGRP Overview
IGRP is a distance vector routing protocol developed by Cisco. IGRP sends routing updates at 90-second intervals that advert for a particular autonomous system.
The following are some key characteristics of IGRP:
IGRP Configuration
Router (config) # router igrp autonomous-system
Router (config-router) # network network-number
The router igrp command selects IGRP as a routing protocol.
router igrp Command
Descriptionautonomous-system Identifies the IGRP router processes that will share routing information.
The network command specifies any directly connected networks to be included.
network Command
Descriptionnetwork-number Specifies a directly connected network: a NIC network number, not subnet or individual address.
28) List the required IPX address and encapsulation type.
How to Determine the IPX Address
You must use a valid IPX network address when you configure the Cisco router. Because the Novell NetWare networks are likely to be already established with IPX addresses, determine the IPX address from these already established networks. The IPX network address refers to the "wire"; all routers on the same wire must share the same IPX network address.
The first and recommended way to find out what address to use is to ask the NetWare Administrator. Make sure that the NetWare administrator specifies the IPX network address for the same network where you want to enable IPX on your Cisco router. The Cisco router must use the same network as the NetWare file server (or other source of the address) specified by the NetWare administrator.
If you cannot obtain an IPX address to use from the NetWare administrator, you can get the neighbour’s IPX address directly from a neighbour router. Pick the most appropriate of the several methods available to do this:
On the Cisco router, you must use the same IPX network address as the address that already exists on the network.
Multiple Novell Encapsulations
Novell IPX name Framing Structure
Ethernet_II
Ethernet_802.2
Ethernet_SNAP
Ethernet_802.3
The Novell IPX protocol on Cisco routers supports all the framing used on Novell NetWare implementations. These framing types include service access service access point (SAP), Ethernet, 802.3 with 802.2 logical link (LLC) protocol, and Subnetwork Access Protocol (SNAP).
There are four different Ethernet framing types with variations in the fields they use. Each encapsulation type is appropriate in specific situations:
Note
Multiple encapsulation can be specified on an interface, but only if multiple network numbers have also been assigned. Although several encapsulation types can share the same interface, clients and servers with different encapsulation types cannot communicate directly with each other.Cisco Encapsulation Names
Novell IPX Name Cisco IOS Name
Ethernet_II arpa
Ethernet_802.2 sap
Ethernet_SNAP snap
Ethernet_802.3 novell-ether
Token-Ring token
Token-Ring_SNAP snap
When you configure an IPX network you may need to specify a nondefault
encapsulation type. To help you specify the appropriate encapsulation type, use the table above. The table matches the Novell framing terms to equivalent Cisco IOS names for the same framing types.
When you configure Cisco IOS software for Novell IPX, use the Cisco name for the appropriate encapsulation.
If you do not specify an encapsulation type when you configure the router for IPX, the router will use a default encapsulation type on its interfaces.
The default encapsulation types on Cisco router interfaces and their keywords are:
29) Enable the Novell IPX protocol and configure interfaces.
Novell IPX Configuration Tasks
Configuration of Novell IPX as a routing protocol involves both global and interface parameters.
Global tasks:
Interface tasks:
Novell IPX Global Configuration
Router (config)# ipx routing [node]
Router (config)# ipx maximum-paths paths
The ipx routing command enables Novell IPX routing, If no node address is specified, the Cisco router uses the MAC address of the interface.
If a Cisco router has only serial interfaces, an address must be specified.
The ipx maximum-paths command enables load sharing.
ipx maximum-paths
Command
DescriptionPaths Maximum number of parallel paths to the destination; the default is 1 and the maximum is 512.
Novell IPX Interface Configuration
Router (config-if)# ipx network number [encapsulation encapsulation-type]
[secondary]
The ipx network command enables Novell IPX processing on this interface.
ipx network Command
Descriptionnumber Each interface must have a unique Novell IPX network number that is specified in hexadecimal and up to eight hexadecimal numbers in length.
encapsulation-type (Optional) Specifies the encapsulation type for the interface. Can be one of the following types: novell-ether, sap, arpa, snap.
secondary (Optional) Applies another network number and encapsulation to interface,
Assigning the second network number is necessary if an additional encapsulation type is linked to individual network.
Novell IPX Configuration Example
ipx routing
ipx maximum-paths 2
interface ethernet 0
ipx network 9e encapsulation novell-ether
ipx network 6c encapsulation sap secondary
interface ethernet 1
ipx network 4a encapsulation sap
interface serial 0
ipx network 1
In the example:
Command Description
ipx routing Selects IPX as a routing protocol and starts the routing process.
ipx maximum-paths 2 Allows load sharing over parallel metric paths to the destination. The number of parallel paths used is limited to two.
Command Description
ipx network 9e encapsulation novell-ether
9e Network number assigned to interface E0.
encapsulation novell-ether Specifies that Novell’s unique frame format is used on this network segment. Cisco’s keyword is novell-ether; Novell’s terminology is Ethernet_802.3
Command Description
ipx network 6c encapsulation sap secondary
6c Assigns a secondary network number to interface E0.
encapsulation sap secondary Specifies the encapsulation type for this secondary network on E0. Cisco’s keyword is sap; Novell’s terminology is Ethernet_802.2. This type of frame is Ethernet 802.3 with 802.2 LLC included.
30) Monitor Novell IPX operation on the router.
Verify IPX Operation
Once IPX routing is configured, you can monitor and troubleshoot it using the following commands:
Monitoring Command Displays
show ipx interface IPX status and parameters.
show ipx route Routing table contents.
show ipx servers IPX server list.
show ipx traffic Number and type of packets.
Troubleshooting Command Displays
debug ipx routing activity Information about RIP update packets.
debug ipx sap Information about SAP update packets.
Monitoring IPX Status
Router# show ipx interface ethernet 0
Ethernet0 is up, line protocol is up
IPX address is 3010.aa00.0400.0284, NOVELL-ETHER [up] line-up, RIPPQ: 0 SAPPQ: 0
Delay of this Novell network, in ticks is 1
IPXWAN processing not applied on this interface.
IPX SAP update interval is 1 minute(s)
IPX type 20 propagation packet forwarding is disabled
Outgoing access list is not set
IPX Helper access list is not set
SAP Input filter list is not set
SAP Output filter list is not set
SAP GNS Output filter list is not set
Input filter list is not set
Output filter list is not set
Router filter list is not set
Netbios Input host access list is not set
Netbios Input bytes access list is not set
Netbios Output host access list is not set
Netbios Output bytes access list is not set
Update time is 60 seconds
IPX accounting is disabled
IPX fast switching is configured (enabled)
IPX SSE switching is disabled
RIP packets received 1, RIP packets sent 10006
SAP packets received 1, SAP packets sent 6
--More--
The show ipx interface command shows the status of IPX interface and IPX parameters configured on each interface.
The first highlighted line shows the IPX address, the type of encapsulation, and the status of the interface.
The middle set of highlighting shows that the SAP filters are not set.
The last highlighted line shows that fast switching is enabled.
You can manually set the tick metric. Use the command ipx delay number where number is the ticks to associate with an interface. This command manually overrides the following defaults on the Cisco router:
Monitoring IPX Routing Tables
Router# show ipx route
Codes: C – Connected primary network, c – Connected secondary network
R – RIP, E – EIGRP, S – static, W – IPXWAN connected
5 Total IPX routes
Up to 2 parallel paths allowed Novell routing algorithm variant in use
R Net 3020 [6/1] via 3021.0000.0c03.13d3, 23 sec, 1 uses, Serial1
Via 3020.000.0c03.13d3, 23 sec, 0 uses, Serial0
C Net 3020 (X.25), is directly connected, 15 uses, Serial0
C Net 3021 (HDLC) is directly, connected, 15 uses, Serial1
C Net 3010 (NOVELL-ETHER), is directly connected, 15 uses, Ethernet0
C Net 3000 (NOVELL-ETHER), is directly connected, 15 uses, Ethernet1
The show ipx route command displays the contents of the IPX routing table.
The first highlighted line provides routing information for a remote network:
The second line of highlighting provides information about a direct connection:
Monitoring IPX Servers List
Router> show ipx servers
Codes: P – Periodic, I – Incremental, H – Holddown, S – static
1 Total IPX Servers
Table ordering is based on routing and server info
Type Name Net Address Port Route Hops Itf
P4 MAXINE AD33000.0000.1b04.0288:0451 332800/1 2 Et3
The show ipx servers command lists the IPX servers discovered through SAP advertisements.
This example provides the following information:
Monitoring IPX Traffic
Router# show ipx traffic
System Traffic for 2018.0000.0000.0001 System-Name: dtp-18
Rcvd: 23916 Total, 13785 format error, 0 checksum errors, 0 bad hop count,
0 packets pitched, 23916 local destination, 0 multicast
Bcast: 17111 received, 9486 sent
Sent: 167076 generated, 0 forwarded
0 encapsulation failed, 0 no route
SAP: 6 SAP requests, 6 SAP replies, 2309 servers
0 SAP Nearest Name requests, 0 replies
0 SAP General Name requests, 0 replies
1521 SAP flash updates sent, 0 SAP format errors
RIP: 6 RIP requests, 6 RIP replies, 2979 routes
8033 RIP advertisements received, 4300 sent
154 RIP flash updates sent, 0 RIP format errors
Echo: Rcvd 0 requests, 0 replies
Sent 0 requests, 0 replies
0 unknown: 0 no socket, 0 filtered, 0 no helper
0 SAPs throttled, freed NDB len 0
Watchdog:
0 packets received, 0 replies spoofed
Queue lengths:
IPX input: 0, SAP 0, RIP 0, GNS 0
SAP throttling length: 0/(no limit), 0 nets pending lost route reply
Delayed process creation: 0
The show ipx traffic command displays information about the number and type of IPX packets received and transmitted by the router.
Notice in this example that a high percentage of the total number of packets received and sent were RIP advertisements. This is because this sample was taken from a lab network with essentially no user traffic on it. This screen shows how much overhead traffic IPX generates.
Troubleshooting IPX Routing
Router# debug ipx routing activity
IPX routing debugging is on
Router#
IPXRIP: positing full update to 3010.ffff.ffff.ffff via Ethernet0 (broadcast)
IPXRIP: positing full update to 3000.ffff.ffff.ffff via Ethernet1 (broadcast)
IPXRIP: positing full update to 3020.ffff.ffff.ffff via Serial0 (broadcast)
IPXRIP: positing full update to 3021.ffff.ffff.ffff via Serial1 (broadcast)
IPXRIP: sending update to 3020.ffff.ffff.ffff via Serial0
IPXRIP: src=3020.0000.0c03.14d8, dst=3020.ffff.ffff.ffff, packet sent
network 3021, hops 1, delay 6
network 3010, hops 1, delay 6
network 3000, hops 1, delay 6
IPXRIP: sending update to 3021.ffff.ffff.ffff via Serial1
IPXRIP: scr=3021.0000.0c03.14d8, dst=3021.ffff.ffff.ffff, packet sent
network 3020, hops 1, delay 6
network 3010, hops 1, delay 6
network 3000, hops 1, delay 6
IPXRIP: sending update to 3010.ffff.ffff.ffff via Ethernet0
IPXRIP: src=3010.aa00.0400.284, dst=3010.ffff.ffff.ffff, packet sent
network 3030, hops 2, delay 7
network 3020, hops 1, delay 1
network 3021, hops 1, delay 1
network 3000, hops 1, delay 1
IPXRIP: sending update to 3000.ffff.ffff.ffff via Ethernet1
The debug ipx routing activity command displays information about IPX routing update packets that are transmitted or received.
A router sends an update every 60 seconds. Each update can contain up to 50 entries. If there are more than 50 entries in the routing table, the update will include more than one packet.
In this example, the router is sending updates but not receiving them. Updates received from other routers would also appear in this listing.
Troubleshooting IPX SAP
Router# debug ipx sap
IPX SAP debugging is on
Router#
Novell SAP: at 0023F778
I SAP Response type 0x2 len 160 src:160.0000.0c00.070d dest:160.ffff.ffff.ffff(452)
Type 0x4, "HELLO2", 199.0002.0004.0006 (451), 2 hops
Type 0x4, "HELLO1", 199.0002.0004.0008 (451), 2 hops
NovellSAP: sending update to 160
NovellSAP: at 00169080
O sap Update type 0x2 len 96 ssoc:0x452 dest:160.ffff.ffff.ffff (452)
Novell: type 0x4 "Magnolia", 42.0000.0000.0001 (451), 2 hops
The debug ipx sap command displays information about IPX SAP packets that are transmitted or received.
Like RIP updates, these SAP updates are sent every 60 seconds and may contain multiple packets. Each SAP packet appears as multiple lines in the output, including a packet summary message and a service detail message.
SAP responses may be one of these types:
0x1 – General query
0x2 – General response
0x3 – Get Nearest Server request
0x4 – Get Nearest Server response
In each line, the address and disance of the responding or target router is listed.
31) Describe Cisco’s implementation of Frame Relay & Recognise key Frame Relay terms and features.
Introduction to Frame Relay
Frame Relay operates like a streamlined, speeded-up descendant of X.25. In many industrialised countries, Frame Relay has been replacing the more complex, slower packet-switching services.
Regional Bell Operating Companies (RBOCs), alternate WAN carriers, and Post, Telephone, and Telegraph (PTT) providers have widely deployed a digital communication infrastructure that operates inside the WAN cloud.
At the same time, end-user devices at the edge of the WAN cloud increasingly demand wide area connections that provide higher transmission speeds, lower network delays, and efficient bandwidth to accommodate bursty data.
Frame Relay is based on virtual (VCs). Because of its relatively high-speed throughput and minimal overhead, Frame Relay is well suited for connecting LANs across a WAN. Because the router encapsulates upper-layer data in Frame Relay, it provides a DTE connection to the communications cloud DCE, which is a Frame Relay switch.
Frame Relay operates over permanent virtual circuits (PVCs). This means that connections are static, provisioned by a configuration statement. Multiple PVCs can interconnect DTEs across the Frame Relay network to a destination.
A data-link connection identifier (DLCI) identifies each PVC. The DLCI provides the major addressing mechanism of the router’s Frame Relay support to the Frame Relay WAN service.
Local Management Interface (LMI) refers to the overhead processing that sets up and maintains the connection between the router and the switch. It contains information about the PVC setup, status inquiries, and keepalive exchanges, as well as DLCI usage.
Frame Relay Stack
The core aspects of Frame Relay function at the lower layers of the OSI reference model.
Using modern physical-layer facilities such as fibre media and digital transmission links, Frame Relay offers higher-speed WAN transmission for end stations, typically on LANs.
Working at the data link layer, Frame Relay encapsulates information from the upper layers of the OSI stack.
Frame Relay operations share some features with older WAN packet switching such as X.25 For example, a Frame Relay interface between the user and the network equipment will transmit and receive frames using first-in, first-out (FIFO) queuing on a statistically multiplexed circuit. Several logical connections, described as virtual circuits, can share the same physical link.
However, unlike X.25, Frame Relay offers a relatively high-speed, streamlined service:
32) List commands to configure Frame Relay LMIs, maps, and subinterfaces.
Cisco LMI Support
Cisco offers broad support to these major Frame Relay protocol variations:
Extensions promoted by this gang of four include virtual circuit status messages (commonly adopted) and three other optional LMI extensions (multicasting, global addressing, and simple flow control).
An administrator setting up a connection to a Frame Relay network must choose the appropriate LMI from these three alternatives to ensure proper Frame Relay operation.
Frame Relay Configuration
Router (config-if) # encapsulation frame-relay [ietf]
Router (config-if) # frame-relay lmi-type { ansi | cisco | q933a }
Use the encapsulation frame-relay command to specify the data-link encapsulation type to be used on the serial interface communicating with the Frame Relay network.
Two different data-link encapsulation are supported:
The default is the Cisco encapsulation developed by the gang of four. This default operates only with other Cisco routers.
The Internet Engineering Task Force (IETF) encapsulation is specified in RFC 1294/1490. This encapsulation allows interoperation with other vendors’ routers.
The encapsulation can be specified globally, as illustrated here, or on a circuit-by-circuit basis, as shown on the next graphic below.
The standard Frame Relay encapsulation, as defined by the IETF, is derived from Point-to-Point Protocol (PPP). The default encapsulation on the Cisco router is proprietary.
Use the frame-relay lmi-type command to select the LMI type.
The router must be configured with the appropriate signalling to match the Frame Relay carrier implementation. All standard LMI signalling formats are supported:
Frame Relay Address Mapping
Router (config) # frame-relay map protocol protocol-address DLCI [ broadcast ]
[ ietf | cisco ]
Use the frame-relay map command to statically map destination network protocol addresses to a designated DLCI.
frame-relay map Command Description
protocol Supported protocol: appletalk, clns, decnet, ip, xns, ipx, vines.
protocol-address Address for the protocol.
DLCI DLCI number of the virtual circuit.
broadcast (Optional) Broadcast should be forwarded when multicast is not enabled.
ietf (Optional) Enables the IETF LMI.
cisco (Optional) Enables the Cisco LMI (default)
Nonbroadcast Multi-access (NBMA)
One model for implementing Frame Relay in an internetwork is called nonbroadcast multiaccess (NBMA). The NBMA model makes all routers connected by virtual circuits peers on the same IP network or subnetwork. Because Frame Relay does not support broadcasting, the routers must copy all broadcasts and transmit on each virtual circuit.
For routing protocols that allow split horizon to be turned off, full connectivity can be achieved in a partial mesh configuration. For protocol such as AppleTalk RTMP, which do not allow split horizon to be turned off, connectivity is restricted between routers that are directly connected by virtual circuits.
Frame Relay Maps Example
Cisco A
interface serial 0
ip address 172.16.11.2 255.255.255.0
!
! enable frame relay, use the ANSI LMI
encapsulation frame-relay
frame-relay lmi-type ansi
! Note: for alternate ietf encap, also use lmi-type ansi
!
!set up a static frame relay map - full mesh
!
frame-relay map ip 172.16.11.3 48 broadcast
frame-relay map ip 172.16.11.4 110 broadcast
In the example:
encapsulation frame-relay – Sets encapsulation type to Cisco (default).
frame-relay lmi-type ansi – Selects LMI to ANSI
frame-relay map Command Description
ip Higher-level protocol.
172.16.11.3 Address being mapped.
48 DLCI used to reach the destination.
broadcast Allows broadcasts, such as routing updates, to be forwarded.
IP traffic destined for 172.16.11.3 will use DLCI 48 to negotiate the Frame Relay cloud. Interface serial 0 will send broadcast traffic as well as IP traffic.
Cisco A is configured with a frame-relay map statement for every peer router. In this example, we show a fully meshed configuration with three routers.
Because of the overhead associated with copying broadcasts to a large number of peer routers, it is important to limit the number of routers in an NBMA group.
Split Horizon and Frame Relay
In an NBMA environment, routers trying to forward updates face another condition that can cause trouble. This condition comes from the operation of split horizon on a serial interface attached to WAN services.
With split horizon, if a router learns a route from an interface, it does not propagate information about that route back out that same interface. For Frame Relay, this condition applies for all routing protocols except those in the IP suite (for example, RIP IGRP, Enhanced IGRP). Split horizon also applies to all service advertisements (for example, IPX SAP or GNS traffic, and AppleTalk ZIP updates).
Full Mesh for Frame Relay
Because the split-horizon mechanism will not allow routers to send updates into and then out of the same interface, you could provision for connectivity by operating Frame Relay with a full mesh. This sets up a Frame Relay data link from every router to every other destination. Then at each router you configure a DLCI to each destination of that router.
However, this approach to connect routers over the Frame Relay WAN involves key disadvantages:
An Altenative: Subinterfaces
An NBMA WAN environment needs to act like a LAN regarding its multiaccess operations. However, split horizon does not allow multiaccess updates into, and then out from, the same single serial line. Although routers need to get around split horizon for updates that use the WAN, the alternative of provisioning a full mesh may be impractical.
Another alternative establishes a number of virtual interfaces on a single physical serial interface. These virtual interfaces are logical constructs called subinterfaces.
You define these logical subinterfaces on the serial line. Each subinterface uses a DLCI that represents the destination for a Frame Relay PVC on your network. After you configure the Frame Relay interface DLCI on the subinterface, your router must associate one or more protocol addresses from the destination to the DLCI.
Keep in mind that you have still defined only the single S0 physical interface on router A. However, on that single S0, you have now defined an S0.1 subinterface for the Frame Relay DLCI to router B, an S0.2 subinterface for router C, and an S0.3 subinterface for router D.
Partial Mesh for Frame Relay
When you define logical subinterfaces on a single physical interface, Frame Relay operates using a partial-mesh design.
To do so, you associate the DLCI for a destination to a subinterface. Use one DLCI and one subinterface for each destination router.
With subinterfaces configured, routers can connect with each other and send updates. Routers bypass the split horizon in effect for the single physical interface on router A’s S0.
As result you can connect all routers without needing a separate Frame Relay PVC between each router. The overall configuration to accomplish these connections is much simpler – you no longer need a map statement for each protocol address on each destination of each router.
Router(config)# interface type .subinterface-number point-to-point
Router(config-if)# frame-relay interface-dlci dlci broadcast
Before you can configure and use Frame Relay subinterfaces, you must first have a physical interface set up with encapsulation for Frame Relay. The commands and description for Frame Relay subinterfaces follows. The command defines the subinterface.
Command
Descriptiontype Any interface suitable for Frame Relay. Usually a serial interface.
.subinterface-number number
refers to the number of the physical interface; following the dot, subinterface is a unique integer on that interface.point-to-point This required keyword specifies that the subinterface refers to a single Frame Relay destination; the alternative argument is multipoint.
The frame-relay interface-dlci command assigns a Frame Relay DLCI to the subinterface.
Command Description
dlci The DLCI you designate to indicate the destination on the subinterface you defined with the first command.
broadcast Allows the subinterface to forward broadcasts, such as routing updates.
Follow these commands by defining a destination’s network address that Frame Relay will represent using the DLCI.
Frame Relay with Subinterfaces
When you configure subinterfaces and Frame Relay DLCIs, the network architecture that results uses a different subnet for the link on each subinterface, as the graphic shows.
This design differs from point-to-point mapping for NBMA. In that configuration, all routers acted as peers on a single subnetwork. The configuration used fully meshed PVCs.
However, when you use Frame Relay with subinterfaces, only the two routers on a PVC act as subnet peers. The Frame Relay configuration contains multiple subnetworks.
The DLCI on the subinterface represents one or more destination protocol addresses.
The following graphic shows the configuration commands used to implement this configuration.
A full mesh is no longer necessary full update connectivity. No Frame Relay facility directly connects the two routers on the right. Using this approach saves the organisation the initial and ongoing expenses otherwise necessary with a full-mesh network.
Subinterface Configuration Example
Cisco A
interface serial 0
Encapsulation frame-relay
!
! the first of the two subinterfaces
interface s 0 .1 point-to-point
! assign the DLCI to the subinterfaces
frame-relay interface-dlci 110 broadcast
! indicate the destination protocol address for DLCI 110
ipx network 4a1d
!
! the second subinterface on the S0 interface
interface s 0.2 point-to-point
frame-relay interface-dlci 48 broadcast
ipx network 4c1d
To configure Frame Relay subinterfaces, you start with the same commands you saw earlier. This example assumes that the Frame Relay LMI uses the default encapsulation cisco. In the example:
The interface s 0.n point-to-point command assigns a subinterface on the designated interface (S0).
n Subinterface number from 1 through 42944967293.
point-to-point Establishes the type of the subinterface.
The frame-relay interface-dlci nn broadcast command sets the DLCI to use on the subinterface.
nn Locally unique number from the DLCIs provided by the Frame Relay network service.
Broadcast Indicates that broadcast traffic can use the DLCI to the destination.
The ipx network nnnn command sets the network number. The subinterface DLCI refers to this destination.
Inverse ARP for Network Discovery
.
Configurations using either NBMA groups or subinterface DLCI can be simplified through use of the Inverse ARP protocol. With Inverse ARP, the router needs to know only its own network protocol address on the NBMA network or subnet.
The router learns about the virtual circuits through LMI signalling from the Frame Relay switch. The router then learns the network address of each peer router by sending and receiving Inverse ARP messages on each added DLCI.
Using Inverse ARP for DLCIs
As soon as you specify DLCIs for Frame Relay, Inverse ARP automatically starts.
With Inverse ARP, the process resolves to a network address when given a DLCI. The router announces a network address and DLCI. The Frame Relay Inverse ARP allows the Frame Relay network to propagate the information.
Because Inverse ARP for Frame Relay is on by default, if you need to disable Inverse ARP on a local DLCI, use the no frame-relay inverse-arp command.
This configuration replaces the need for frame-relay map commands. However, any entries resulting from frame-relay map commands continue to establish static routes.
The configuration also replaces the need for entering specific network protocol address statements for subinterface configurations. However, any specific addresses you enter take precedence over any addresses for that protocol resolved by Inverse ARP.
The lines of text that describe the various arrows on the graphic are not commands the administrator must enter. Instead, they show the status of information that Inverse ARP uses for Frame Relay networks.
33) List commands to monitor Frame Relay operation in the router.
Showing a Frame Relay Interface
Router# show int s 0
Serial 0 is up, line protocol is up
Hardware is MCI Serial
Internet address is 172.16.11.2, subnet mask is 255.255.255.0
MTU 1500 bytes, BW 56 Kbit, DLY 20000 usec, rely 252/255, load 1/255
Encapsulation FRAME-RELAY, loopback not set, keepalive set (10 sec)
LMI DLCI 1023, LMI sent 1, LMI stat recvd 0, LMI upd recvd 0
Last input 0:04:42, output 0:00:07, output hang never
Last clearing of "show interface" counters never
Output queue 0/40, 0 drops; input queue 0/75, 0 drops
Five minute input rate 0 bits/sec, 0 packets/sec
Five minute output rate 0 bits/sec, 0 packets/sec
6019 packets input, 305319 bytes, 0 no buffer
Received 2973 broadcasts, 0 runts, 0 giants
7 input errors, 0 CRC, 0 frame, 0 overrun, 0 ignored, 7 abort
8595 packets output, 3499314 bytes, 0 underruns
0 output errors, 0 collisions, 10 interface resets, 0 restarts
17 carrier transitions
Using the show interface serial command displays a snapshot of current Frame Relay settings. In particular, note the encapsulation set to Frame Relay, and the bandwidth set to 56 kbps. Also note that LMI transactions will use DLCI 1023.
Monitoring Frame Relay
Router#terminal monitor
Router#no logging console
Router#debug frame-relay lmi
Serial 0 (out): StEnq, clock 20212760, myseq 206, mineseen 205, yourseen 136, DTE up
Serial 0 (in): Status, clock 20212766, myseq 206
RT IE 1, length 1, type 1
Serial 0 (out): StEnq, clock 20212770, myseq 207, mineseen 206, yourseen 138, DTE up
Serial 0 (in): Status, clock 20212776, myseq 207
RT IE, length 1, type 0
KA IE 3, length 2, yourseq 146, myseq 298
PVC IE 0x7, length 0x6, dlci 48, status 0, bw 56000
PVC IE 0x7, length 0x6, dlci 58, status 0, bw 56000
PVC IE 0x7, length 0x6, dlci 110, status 4, bw 56000
Your Frame Relay configuration enables the router to interface the Frame Relay service provider network. The router exchanges LMI packets with provider’s Frame Relay switch. Use the debug frame-relay lmi command to see an indication of the exchanged information between your router and your Frame Relay service provider.
The sample display from this debug command includes the following information:
Command
DescriptionSerial 0 (out) Indicates an LMI packet sent out from the router on that interface.
DTE up Frame Relay line protocol is up for the user-side interface.
Serial 0 (in) Indicates an LMI sent by the provider switch into the router.
Type 1(or type 0) Status update is abbreviated (type 1), or full (type 0).
PVC IE…..dlci 48, status 0 Full status update PVC information element on DLCI 48 shows that DLCI has been added to the network and is inactive.
Bw 56000 PVC for the DLCI uses a 56-kbps Frame Relay facility.
34) Identify PPP operations to encapsulate WAN data on Cisco routers.
PPP LCP Configuration Options
Feature How it Operates Protocol
Authentication. Require a password. PAP.
Perform Challenge Handshake. CHAP.
Compression. Compress data at source; Stacker or
reproduce data at destination. Predictor.
Error Monitor data dropped on link. Quality.
Detection. Avoid frame looping. Magic Number.
Multilink. Load balancing across Multilink
multiple links. Protocol (MP).
RFC 1548 describes PPP operation and LCP configuration options. Cisco routers that use PPP encapsulation include the LCP options shown in the table.
Two compression protocols available in Cisco routers are Stacker and Predictor.
Packet fragmentation and sequencing, as specified in RFC 1717, splits the load for PPP and sends fragments over parallel circuits. In some cases, this "bundle" of multilink PPP pipes functions as a single logical link, improving throughput and reducing latency between peer routers.
Configuring PPP
Router (config-if) # encapsulation ppp
Router (config-if) # ppp authentication pap
Router (config-if) # ppp authentication chap
Router (config) # username name password secret-pwd
The commands shown in graphic relate to PPP configuration most commonly used ISDN on Cisco routers.
Note
: The administrator may use either PAP or CHAP, but not both, on a PPP link. PAP uses the exchange of clear-text passwords between the calling and called sides of the link. Alternatively, CHAP is a more sophisticated process that authenticates the caller without disclosing the password on the link. CHAP is less vulnerable to line taps and is generally preferred because it provides better security.35) Configure standard access lists to figure IP traffic.
IP Standard Access Configuration
Router (config)#
access-list access-list-number {permit | deny} source [source-mask]
Router (config)# ip access-group access-list-number { in | out }
The access-list command creates an entry in a standard traffic filter list.
access-list Command Description
access-list-number Identifies the list to which the entry belongs; a number from 1 to 99.
permit | deny Indicates whether this entry allows or blocks traffic from the specified address.
source Identifies source IP address
source-mask Identifies which bits in the address field are matched. It has a 1 in positions indicating "don’t care" bits, and a 0 in any position that is to be strict followed.
The ip access-group command links an existing access list to an outbound interface. Only one access list per port per protocol per direction is allowed.
ip access-group
Command
Descriptionaccess-list-number Indicates the number of the access list to be linked to this interface.
in | out Selects whether the access list is applied to the incoming or outgoing interface. If in or out is not specified, out is the default
Note
To remove an access list, first enter the no access-group command with all of its set parameters, then enter the no access-list command with all of its set parameters.
Standard Access List Example 1
access-list 1 permit 172.16.0.0 0.0.255.255
(implicit deny all – not visible in the list)
(access-list 1 deny 0.0.0.0 255.255.255.255)
interface ethernet 0
ip access-group 1 out
interface ethernet 1
ip access-group 1 out
In the example:
access-list Command Description
permit Traffic that matches selected will be forwarded.
172.16.0.0 IP address that will be used with the wildcard mask to identify the source network.
0.0.255.255 Wildcard mask; 0s indicate positions that must match, 1s indicate "don’t care" positions.
ip access-group 1 out
Links the access list to an outgoing interface.Command
This access list allows only traffic from source network 172.16.0.0 to be forwarded. Non-172.16.0.0 network traffic is blocked.
Standard Access List Example 2
access-list 1 deny host 172.16.4.13
access-list 1 permit 0.0.0.0 255.255.255.255
(implicit deny all)
(access-list 1 deny 0.0.0.0 255.255.255.255)
interface ethernet 0
ip access-group 1
In the example:
access-list Command Description
deny Traffic that matches selected parameters will not be forwarded.
0.0.0.0 Wildcard mask; 0s indicate positions that must match, 1s indicate "don’t care" positions. All 0s in the mask indicates that all 32 bits will be checked in the source address.
access-list Command Description
Permit Traffic that matches selected parameters will be forwarded
The access list is designed to block traffic from a specific address, 172.16.4.13, and to allow all other traffic to be forwarded on interface Ethernet 0.
Standard Access List Example 3
access-list 1 deny 172.16.4.0 0.0.0.255
access-list 1 permit any
(implicit deny all)
(access-list 1 deny 0.0.0.0 255.255.255.255)
interface ethernet 0
ip access-group
In the example:
access-list Command Description
deny Traffic that matches selected parameters will not be forwarded.
access-list Command
DescriptionPermit Traffic that matches selected parameters will be forwarded.
any
Abbreviation for the IP address of the source; all 0s indicate a placeholder and the wildcard mask 255.255.255.255. All 1s in the mask indicates that all 32 bits will not be checked in the source address.This access list is designed to block traffic from a specific subnet, 172.16.4.0, and to allow all other traffic to be forwarded.
36) Monitor and verify selected access list operations on the router.
Monitoring Access Lists
The show ip interface command displays IP interface information and indicates whether any access lists are set.
Router# sho ip interface
Ethernet 0 is up, line protocol is up
Internet address is 192.54.222.2, subnet mask is 255.255.255.0
Broadcast address is 255.255.255.255
Address determined by non-volatile memory
MTU is 1500 bytes
Helper address is 192.52.71.4
Secondary address 131.192.115.2, subnet mask 255.255.255.0
Outgoing access list 10 is set
Inbound access list is not set
Proxy ARP is enabled
Security level is default
Split horizon is enabled
ICMP redirects are always sent
ICMP unreachables are always sent
ICMP mask replies are never sent
IP fast switching is enabled
TCP/IP header compression is disabled
Probe proxy name replies are disabled
Monitoring Access List Statements
Router> show access-lists
Standard IP access list 19
permit 172.16.19.0
deny 0.0.0.0, wildcard bits 255.255.255.255
Standard IP access list 49
permit 172.16.31.0, wildcard bits 0.0.0.255
permit 172.16.194.0, wildcard bits 0.0.0.255
permit 172.16.195.0, wildcard bits 0.0.0.255
permit 172.16.196.0, wildcard bits 0.0.0.255
Extended IP access list 101
permit tcp 0.0.0.0 255.255.255.255 0.0.0.0 255.255.255.255 eq 23
Type code access list 201
permit 0x6001 0x0000
Type code access list 202
permit 0x6004 0x0000
deny 0x0000 0xFFFF
Router>
The show access-lists command displays the contents of all access lists. This Cisco IOS command provides more details about the access list statements. By entering the access list name or number as an option for this command, you can see a specific list.
37) State a relevant use and context for ISDN networking.
Using ISDN Services
Integrated Services Digital Network (ISDN) is a complex call processing system that allows telephone networks to carry voice, data, and other source material in the same all-digital communication stream.
The product features much faster call setup using out-of-band signalling than modem connections. For example, a duration of less than 1 second can be sufficient to make some ISDN calls.
Once a call is up, ISDN can carry a variety of user-traffic feeds. The ISDN model shows ISDN providing access to all-digital facilities for video, telex, packet-switched data, and enriched telephone net services.
ISDN users access bearer (B) channel services at 64kbps – much faster than common modem alternatives of 14.4 kbps. With multiple B channels, ISDN offers users more bandwidth on WANs than they receive with a leased line at 56 kbps in North America or 64 kbps in much of the rest of the world.
ISDN is fast becoming the transport of choice for applications using remote connectivity, access to the Internet, and the World Wide Web (WWW). Before the tremendous growth in these applications, many in the United States believed ISDN was a solution looking for a problem.
38) Identify ISDN protocols, function groups, reference points, and channels.
ISDN Protocols
Work on standards for ISDN began in the late 1960s. A comprehensive set of ISDN recommendations was published in 1984 and is continuously updated by CCITT – now the International Telecommunication Union Telecommunication Standardisation Sector (ITU-T).
ITU-T groups and organises the ISDN protocols according to general topic areas.
Q.931 recommends a network layer between the terminal endpoint and the local ISDN switch. This protocol does not impose an end-to-end recommendation. The various ISDN providers and switch types can and do use various implementations of Q.931. Other switches were developed before the standards groups finalised these standards.
ISDN Functions/Reference Points
To access ISDN, you must provide functions and reference points that comply with ISDN service provider standards. By using these functions and reference points, you can improve communication with vendors and service providers while you engineer, install and support your support your ISDN facilities.
The following table defines the basic ISDN device or hardware acronym and its function.
TA (Terminal Adapter) - Converts from RS232, V.35, and other signals into BRI signals
TE1 (Terminal End-point 1) - Designates a router as a device having a native ISDN interface.
TE2 (Terminal End-point 2) - Designates a router as a device requiring a TA for its BRI signals.
NT1 (Network Termination 1) - Converts BRI signals into a form used by the local loop.
LT (Local Termination) - Portion of the exchange that communicates with other ISDN.
ET (Exchange Termination) - Portion of the exchange that communicates with other ISDN components.
Reference points – CCITT has defined the ISDN local loop characterised by different interfaces. The standards call these key reference points R, S, T, U, and V.
The connection between TE1 or TE2 and NT2 is reference point S
The connection between TE2 and TA is reference point R
The connection between NT2 and NT1 is reference point T
The connection between NT1and LT is reference point U
The connection between LT and ET is reference point V
Customer Premises to ISDN
ISDN specifies two main interface types: BRI and PRI.
In Europe and much of the rest of the world, PRI offers 30 B channels and a D channel (an E1 facility). PRI uses a data service unit/channel service unit (DSU/CSU) for T1/E1 connection.
The boundary between customer premise equipment (CPE) and equipment controlled exclusively by the ISDN service provider affects hardware acquisition and operation duties required for ISDN service.
Regional differences determine who provides key ISDN functions and where the equipment is located:
ISDN Channels for BRI are 2B+D
BRI is sometimes written as 2B+D. This interface provides two bearer channels at 64 kbps and an additional 16 kbps signalling channel.
The B channels can be used for digitised speech transmission or for relatively high-speed data transport. Narrowband ISDN is circuit switched oriented. The B channel is the elemental circuit-switching unit.
The D channel carries signalling information (call setup) to control calls on B channels at the user-network interface. In addition to carrying signalling information, the D channel is used to carry subscriber low-rate packet data, such as alarm systems. Cisco routers do not currently use this facility. Traffic over the D channel employs the LAPD data-link-level protocol. LAPD is based on HDLC.
The call setup follows the ITU-T Q.931 recommendation for call control standards.
39) Describe Cisco’s implementation of ISDN BRI.
Cisco ISDN Features
ISDN provides WAN transport for all major routing protocols. ISDN also works with other WAN services such as X.25 and Frame Relay.
Cisco offers a broad range of ISDN products, including several router models that contain native ISDN interfaces. Administrators can use an SNMP-based network management application to control the ISDN interfaces. Routers use an ISDN Management Information Base (MIB) and can act as managed objects.
The multiple, independent B channels on router ISDN configurations transmit data at the standard 64-bps (DS0) rate, or you can configure for 56-kbps facilities.
The bandwidth-on-demand option allows a pre-established load threshold setting to add available B-channel resources to an ISDN call. This DDR dialler load condition could, for example, add a DS0 on demand.
Another option on Cisco routers is to pre-establish table entries on a destination router to provide incoming ISDN call screening. The destination (or called router) acts on entries that specify which calls from a source (or calling) router the destination will accept.
PPP encapsulation offers improved capabilities for standards-based access to the Internet. Among these improvements are access control and compression methods.
DDR improves the cost-effective use of ISDN by setting conditions that make the ISDN call, then dropping the call once the link is no longer needed.
40) Describe the advantages of LAN segmentation.
You can divide a network into smaller segments to reduce the number of users per segment, thereby increasing the bandwidth available to each user in the segment. Each segment is a collision domain, supporting traffic between nodes without interference from nodes attached to the other segments. As long as user traffic remains on a workgroup segment, each user has more bandwidth available than if all nodes were attached to the original backbone.
41) Describe LAN segmentation using bridges.
Bridges segment LANs by using MAC addresses. MAC Address learning is a service that characterises a learning bridge, in which the source MAC address of each received packet is stored is so that future packets destined for that address can be forwarded only to the bridge interface on which that address is located. Packets destined for unrecognised addresses are forwarded out every bridge interface. This scheme helps minimise traffic on the attached LANs. MAC address learning is defined in the IEEE 802.1 standard.
42) Describe LAN segmentation using routers.
LAN segmentation using routers is simply a router between Lans. Broadcast messages are not forwarded across routed segments. LAN segmentation is done at layer 3 (Network layer) unlike bridging which is done at layer 2 (Data Link Layer).
43) Describe LAN segmentation using switches.
Switch segments are basically are highly intelligent bridged segments, with a few other interesting features such as VLANs (Virtual Local Area Networks), and lots of protocols for tunnelling data between switches. Switches provide the same functionality as bridges except they do it at a wire speed (without introducing latency).
44) Name and describe two switching methods.
Store-and-forward Switching Method
Store-and-forward switching is one of the two main types of LAN switching.
With the store-and-forward switching method, the LAN switch copies the entire flame into its onboard buffers and computes the cyclic redundancy check (CRC).
The frame is discarded if it contains a CRC error, or if it is a runt (less than 64 bytes including the CRC), or a giant (more than 1518 bytes including the CRC).
If the frame does not contain any errors, the LAN switch looks up the destination address in its forwarding or switching, table and determines the outgoing interface. It then forwards the frame toward its destination.
Cut-Through Switching Method
Cut-through switching method, the LAN switch copies only the destination address (the first 6 bytes following the preamble) into its onboard buffers.
It then looks up the destination address in its switching table, determines the outgoing interface and forwards the frame toward its destination.
A cut-through switch provides reduced latency because it begins to forward the frame as soon as it reads the destination address and determines the outgoing interface.
Some switches can be configured to perform cut-through switching on a per-port basis until a user-defined error threshold is reached, when they will automatically change to store-forward mode. When the error rate falls below the threshold, the port automatically changes back to store-and-forward mode.
45) Describe full and half-duplex Ethernet operation.
Half-duplex Ethernet Design
The Ethernet physical connector provides several circuits. Each circuit is used for a specific purpose. The most important of the circuits are receive (RX), transmit (TX), and collision-detection. When standard half-duplex Ethernet is implemented, the TX circuit is active at the transmitting station. When another station is transmitting, the station’s RX circuit is active. Logically, these circuits feed into a single cable creating a situation similar to the narrow one-way bridge analogy
Full-duplex Ethernet Design
Full-duplex Ethernet Switch (FDES) technology provides a transmit circuit connection wired directly to the receiver circuit at the other end of the connection. Since just two stations are connected in this arrangement, a collision-free environment exists here. Unlike half-duplex Ethernet, the conditions for multiple transmissions on the same physical medium do not occur.
Standard Ethernet configuration efficiency is typically rated at 50-60 percent of the 10-Mbps bandwidth. Full-duplex Ethernet offers 100 percent efficiency in both directions. (10-Mbps transmit, and 10-Mbps receive.) This produces a theoretical 20-Mbps of throughput.
Full-duplex Requirements
In order to implement full-duplex Ethernet, you require the following:
46) Identify reasons why the industry uses a layered model.
Most communications environments separate the communication functions and application processing. This separation of networking functions is called layering. For the OSI model, seven numbered layers indicate distinct functions. Within the Transmission Control Protocol/Internet Protocol (TCP/IP), for example, distinct functions fit into five named layers. Regardless of the number of layers, the reasons for this division of network functions include the following:
47) Identify the functions of each layer of the ISO/OSI reference model.
Each layer of the ISO model serves a specific function. Those functions are defined by the OSI and can be used by any network products vendor. The functions are:
Application – The application layer provides network services to user applications. For example, a word processing application is serviced by file transfer services at this layer.
Presentation – This layer provides data representation and code formatting. It ensures that the data that arrives from the network can be used by the application, and it ensures that information sent by the application can be transmitted on the network.
Session – This layer establishes, maintain, and manages sessions between applications.
Transport – This layer segments and reassembles data into a data stream.
Network – This layer determines the best way to move data from one place to another. It manages device addressing and tracks the location of devices on the network. The router operates at this layer
Data Link – This layer provides physical transmission across the medium. It handles error notification, network topology, and flow control.
Physical – This layer provides the electrical, mechanical, procedural, and functional means for activating and maintaining the physical link between systems.
48) Define and explain the 5 conversion steps of data encapsulation.
Data Encapsulation
Each layer depends on the service function of the ISO/OSI layer below it. To provide this service, the lower layer uses encapsulation to put the PDU from the upper layer into its data field; then it can add whatever headers and trailers the layer will use to perform its function.
For example, the network layer provides a service to the transport layer, and the transport layer presents "data" to the internetwork subsystem.
The network layer has the task to of moving that data through the internetwork. It accomplishes this task by encapsulating the data within a header. This header contains information required to complete the transfer, such as source and destination logical address.
The data link layer in turn provides a service to the network layer. It encapsulates the network layer information in a frame. The frame header contains information required to complete the data link functions. For example, the frame header contains physical addresses.
The physical layer also provides a service to the data link layer. This service includes encoding the data link frame into a pattern of ones and zeros for transmission on the medium (usually a wire).
As internetworks perform services for users, the flow and packaging of the information changes. In this example of internetworking, five conversion steps occur:
The medium on the physical internetwork can vary along the path used. For example, the e-mail message can originate on a LAN, cross a campus backbone, go out a low-speed WAN link, and use a higher-speed WAN link until it reaches its destination on another remote LAN.
49) Identify the functions of the TCP/IP transport-layer protocols.
The transport layer performs two functions:
Two protocols provided by the transport layer: TCP and UDP.
TCP Segment Format
Field definitions in the TCP segment:
Port Numbers
Both TCP and UDP use port (or socket) numbers to pass information to the upper layers. Port numbers are used to keep track different conversations crossing the network at the same time.
Application software developers agree to you use well-known port numbers that are defined in RFC 1700. For example, any conversation bound for the FTP application uses the standard port number 21. Conversations that do not involve an application with a well-known port number are assigned port numbers randomly chosen from within a specific range instead. These port numbers are used as source and destination addresses in the TCP segment.
Some ports are reserved in both TCP and UDP, but applications might not be written to support them. Port numbers have the following assigned ranges:
TCP Port Numbers
End systems use port numbers to select the proper application. Originating source port numbers are dynamically assigned by the source host, usually some number greater than 1023.
TCP Three-Way Handshake/Open Connection
Both ends of the connection are synchronised with a three-way handshake/open connection sequence.
Exchanging beginning sequence numbers during the connection sequence ensures that lost data be recovered if problems occur later.
TCP Simple Acknowledgement
The window size determines how much data the receiving station can accept at one time. With a window size of one, each segment must be acknowledged before segment is transmitted. This results in inefficient use bandwidth by the hosts.
TCP Sliding Window
A larger window size allows more data to be transmitted pending acknowledgement.
Window size refers to the number of messages that can be transmitted while awaiting an acknowledgement. After a host transmits the window-size number of bytes, it must receive an acknowledgement before any more messages can be sent.
TCP uses expectational acknowledgements, meaning that the acknowledgement number refers to the octet expected next. The "sliding" part of "sliding window" refers to the fact that the window size is negotiated dynamically during the TCP session.
A sliding window results in more efficient use of bandwidth y the hosts.
TCP Sequence and Acknowledgement Numbers
TCP provides sequencing of segments with a forward reference acknowledgement. Each datagram is numbered before transmission. At the receiving station, TCP reassembles the segments into a complete message. If a sequence number is missing in the series, that segment is retransmitted. Segments that are not acknowledged within a given time period result in retransmission.
UDP Segment Format
UDP uses no windowing or acknowledgements. Application-layer protocols for reliability. UDP is designed for applications that do not need to put sequences of segments together.
Protocols that use UDP include TFTP, SNMP, Network File System (NFS), and Domain Name System (DNS).
50) Identify the functions of the TCP/IP network-layer protocols.
Network Layer Overview
Several protocols operate at the TCP/IP Internet layer, which corresponds to the OSI network layer:
IP Datagram
Field definitions within this IP datagram are as follows:
Protocol Field
The protocol field determines the layer 4 protocol being carried within an IP datagram. Although most IP traffic uses TCP, there are other protocols that can use IP. Each IP must identify the destination Layer 4 protocol for the datagram. Transport-layer protocols are numbered, similar to port numbers. IP includes the protocol number in the protocol field.
Internet Control Message Protocol (ICMP) – read answer to Question 51 below.
Address Resolution Protocol (ARP)
ARP is used to resolve or map a known IP address to a MAC sublayer address to allow communication on a multi-access medium such as Ethernet. To determine a destination address for a datagram, the ARP cache table is checked. If the address is not in the table, ARP sends a broadcast looking for the destination station. Every station on the network receives the broadcast.
The term local ARP is used to describe resolving an address when both the requesting host and the destination host share the same media or wire.
Prior to issuing the ARP, the subnet mask was consulted. The mask determined that the nodes are on the same subnet.
Reverse ARP (RARP)
RARP relies on the presence of a RARP server with a table entry or other means to respond to these requests.
On the local segment, RARP can be used to initiate a remote operating system load system.
51) Identify the functions performed by ICMP.
The Internet Control Message Protocol (ICMP) is implemented by all TCP/IP hosts. ICMP messages are carried in IP datagrams and are used to send error and control messages.
ICMP uses the following types of defined messages. Other exist that are not on this list:
ICMP Testing
If a router receives a packet that is unable to deliver to its ultimate destination, the router sends an ICMP host unreachable message to the source. The message might be undeliverable because there is no known route to the destination.
An echo reply is a successful reply to a ping command; however, results could include other ICMP messages, such as unreachables and time-outs
52) Configure extended access lists to filter IP traffic.
Extended IP Access Lists
Allow more precise filtering conditions
The standard access list (numbered 1 to 99) may not provide the traffic-filtering control you need. Standard access lists filter based on a source address and mask. Standard access lists permit or deny the entire TCP/IP protocol suite. You may need a more precise way to configure your firewall policy.
For more precise traffic-filtering control, use extended IP access lists. Extended IP access list statements check for source address and for destination address. In addition, at the end of the extended access list statement, you gain additional precision from a field that specifies the optional TCP or UDP protocol port number. These can be the well-known port numbers for TCP/IP. A few of the most common port numbers are as follows:
Well-Known Port Number (Decimal) IP Protocol
23 Telnet
25 Simple Mail Transfer Protocol (SMTP)
69 Trivial File Transfer Protocol (TFTP)
By using this option, you can specify the logical operation the extended access list will perform on specific protocols. Extended access lists use a number from the range 100 to 199.
Extended Access List Configuration
Router (config) #
access-list access-list-number {permit | deny} protocol source source-mask destination destination-mask [operator operand] [established]
Router (config-if)
ip access-group access-list-number { in | out }
The access-list command creates an entry to express a condition statement in a complex in a complex filter.
access-list Command
Descriptionaccess-list-number Identifies the list using a number in the range 100 to 199.
permit | deny Indicates whether this entry allows or blocks the specified address.
protocol IP, TCP, UDP, ICMP, GRE, IGRP.
source and destination Identifies source and destination IP addresses.
source-mask and destination-mask Wildcard mask; 0s indicate positions that must match, 1s indicate "don’t care" positions.
operator and operand lt, gt, eq, neq (less than, greater than, equal, not equal), and a port number.
established Allows TCP traffic to pass if packet uses an established connection (for example, has ACK bits sets).
The ip access-group command links an existing extended access list to an outbound interface. Only one access list per port per protocol is allowed.
ip access-group Description
access-list-number Indicates the number of the access list to be linked to this interface.
in | out Selects whether the access list is applied to the incoming or outgoing interface. If in or out is not specified, out is the default.
Extended Access List Example 1
access-list 101 deny tcp 172.16.4.0
0.0.0.255 172.16.3.0 0.0.0.255 eq 21access-list 101 deny tcp 172.16.4.0
0.0.0.255 172.16.3.0 0.0.0.255 eq 20access-list 101 permit ip 172.16.4.
0 0.0.0.255 0.0.0.0 255.255.255.255(access-list 101 deny ip 0.0.0.0 255.255.255.255 0.0.0.0 255.255.255.255)
interface ethernet 0
ip access-group 101
In the example:
access-list Command
Description101 Access list number; indicates extended IP access list.
deny Traffic that matches selected parameters will be blocked.
tcp Transport-layer protocol
172.16.4.0 and 0.0.0.255 Source IP address and mask; the first three octets must match but do not care about the last octet.
172.16.3.0 and 0.0.0.255 Destination IP address and mask; the first three octets must match, but do not care about the last octet.
eq 21 Specifies well-known port number for FTP.
eq 20 Specifies well-known port number for FTP data.
ip access-group 101 Command
Links access list 101 to outgoing port interface E0.The permit statement allows traffic from subnet 172.16.4.0 to be forwarded to all other networks or subnetworks via interface E0.
Extended Access List Example 2
access-list 101 permit tcp 172.16.4.0
0.0.0.255 any eq 25(implicit deny all)
(access-list 101 deny ip 0.0.0.0 255.255.255.255 0.0.0.0 255.255.255.255)
interface ethernet 0
ip access-group 101
In this example:
access-list Command
Description101 Access list number; indicates extended IP access list.
permit Traffic that matches selected parameters will be forwarded.
tcp Transport-layer protocol.
172.16.4.0 and 0.0.0.255 Source IP address and mask; the first three octets must match but do not care about the last octet.
0.0.0.0 and 255.255.255.255 Destination IP address and mask; do not care about any octet value.
eq 25 Specifies well-known port number for SMTP.
ip access-group 101 Command
Links access list 101 to outgoing port interface E0.This example allows only mail from 172.16.4.0 to be sent out interface E0. All other traffic from any other source is denied.
Where to Place IP Access Lists
53) Configure IPX access lists and SAP filters to control basic Novell traffic.
Key Concepts for IPX Access Lists
Novell addressing is based on network.node.socket. The network number is assigned by the assigned by the administrator; the node portion is derived from the MAC address of the individual interface. Serial lines adopt the MAC address of another interface in the creation of their logical addresses. The socket numbers refers to a process or application (somewhat like the TCP segment).
Every NetWare file server has an internal IPX network number and performs IPX routing. External IPX networks attach to router interfaces. The IPX network number assigned on a Cisco router’s interface must be unique and consistent with the network numbers known to the file server.
IPX standard access lists use numbers in the range 800-899. These access lists check for either source address or both source and destination address. To identify parts of the address to check or ignore, IPX standard access lists use a wildcard mask that operates like the mask used with IP addresses. To control the traffic from the Service Advertisement Protocol (SAP), use SAP filters that use numbers in the range 1000 to 1099. Several other packet and route filters can help manage IPX overhead traffic. For example, access lists can control Get Nearest Server (GNS) from clients to servers, Routing Information Protocol (RIP), and NetWare Link Services Protocol (NLSP).
IPX Standard Access Lists Configuration
Router (config)# access-list access-list-number {deny | permit} source-network
[ .source-node] [ source-node-mask ] [ destination-network ]
[ .destination-node ] [ destination-node-mask ]
Router (config)# ipx access-group access-list-number
Use the access-list command to filter traffic in an IPX network. Using filters on the outgoing router interface allows or restricts different protocols and applications on individual networks.
access-list Command
Descriptionaccess-list-number Access list number for an IPX filter list from 800 to 899.
protocol Number of the protocol type, can be: 0=any protocol (refer to socket number below), 1=RIP, 4=SAP, 5=SPX, 17=NCP, 20=IPX NetBIOS.
source-network Source network number, expressed in eight-digit hexadecimal.
source-node Node number on the source network. Represented as a 48-bit value shown in a dotted triplet of 4-digit hexadecimal numbers.
destination-network Network number to which the packet is being sent.
destination-node Node on the destination network to which the packet is being sent.
Use the
ipx access-group Command Description
access-list-number Access list number for an IPX filter from 800 to 899.
Standard IPX Access List Example
ipx routing
access-list 800 permit 2b 4d
(implicit deny all)
int e 0
ipx network 4d
ipx access-group 800
int e 1
ipx network 2b
int e 2
ipx network 3c
In the example:
access-list 800 permit 2b 4d
Command Description
800 Specifies a Novell IPX standard access list.
permit Traffic matching the selected parameters will be forwarded.
2b Source network number.
4d Destination network number.
(implicit deny all) Not a valid configuration command, just a reminder that access lists filter traffic not specified to be forwarded.
ipx access-group 800 Command
Links access list 800 to out going interface E0.
Traffic from 2b destined for network 4d will be forwarded out Ethernet 0.
The access list is applied to an outgoing interface and filters outbound packet.
Notice that the other interfaces E1 and E2 are not subject to the access list; they lack the access group statement to link them to the access list 800.
How to Use SAP Filters
SAP Filter Goals
deny type 7 (print server) SAP from 2a
deny type 98 (access server) SAP from 5b
deny type 24 (router) SAP to 7c
deny type 4 (file server) SAP from 4a
deny type 26a (NMS)
deny type 7a (NetWare from VMS) from *8
permit the remaining SAPs
A table of the most common SAP numbers follows:
SAP Number Server Type
4 NetWare file server
7 Print server
Place SAP filters close to the source. Proper placement of SAP filters conserves critical bandwidth, especially on serial links.
When a SAP advertisement arrives at the router interface, the contents are placed in the SAP table portion of main memory. The contents of the table are propagated during the next SAP update.
When a SAP input filter is in place, the services entered into the SAP table is reduced. The propagated SAP updates represent the entire table, but contain only a subset of all services.
When a SAP output filter is in place, the services propagated from the table are reduced.
The propagated SAP updates represent a portion of the table contents and are a subset of all the known services.
SAP Filter Configuration
Router (config) #
access-list access-list-number {deny | permit} network [.node] [network-mask node-mask] [service-type [server-name]]
Router (config-if) # ipx input-sap-filter access-list-number
Router (config-if) # ipx output-sap-filter access-list-number
Use the access-list command to control propagation of the SAP messages.
access-list Command Description
access-list-number Number from 1000 to 1099, indicates a SAP filter list.
network [.node] Novell source internal network
network-mask node-mask Mask to be applied to the network and node. Place ones in the positions to be masked.
service-type SAP service type to filter. Each SAP service type is identified by a hexadecimal number. Some common examples are:
4 File server.
7 Print server.
24 Remote bridge server (router).
server-name Name of the server providing the specified service type.
The ipx input-sap-filter and ipx output-sap-filter commands place a SAP filter on an interface. The use of input or output determines whether SAPs are filtered before entry into the SAP table, or whether the SAP table contents are filtered during the next update.
SAP table content can be filtered on input by using the ipx router-sap-filter command, which identifies from which router SAP advertisements can be received.
SAP Filter Example 1
access-list 1000 deny 9e.1234.5678.1212 4
access-list 1000 permit –1
interface ethernet 0
ipx network 9e
interface ethernet 1
ipx network 4a
interface serial 0
ipx network 1
ipx output-sap-filter 1000
In this example:
access-list 1000 deny 9e.
1234.5678.1212 4 Command Description
1000 An access list number in the Novell SAP filter range.
deny SAP services matching selected parameters will be blocked.
9e.1234.5678.1212 Source network address of SAP advertisement.
4 Type of SAP service; advertises file service.
access-list 1000 permit –1
Command Description
1000 Access list number.
permit SAP services matching parameters will be forwarded.
-1 Source network number; -1 means all networks.
ipx output-sap-filter 1000
Places list 1000 on interface serial 0 as an outputCommand
SAP filter.File server advertisements from server 9e.1234.5678.1212 will not be forwarded on interface serial 0 (S0). All other SAP services from any source will be forwarded on interface S0.
SAP Filter Example 2
access-list 1001 deny 9e 7access-list 1001 deny 4a 7
access-list 1001 permit –1
interface ethernet 0
ipx network 9e
ipx access-group 1001
interface ethernet 1
ipx network 4a
ipx access-group 1001
interface serial 0
ipx network 1
ipx input-sap-filter 1001
In this example:
access-list 1001 deny 9e (or) 4a
7 Command Description
1001 An access list number in the Novell SAP filter range.
deny SAP services matching selected parameters will be blocked.
9e Source network number of SAP advertisements.
4a Source network number of SAP advertisements.
7 Type of SAP service; advertises print service.
access-list 1001 permit –1
Command Description
1001 Access list number.
permit SAP services matching parameters will be forwarded.
-1 Source network number; -1 means all networks.
ipx access-group 1001
Links access list 1001 to outgoing port interfaces E0Command
and E1.ipx input-sap-filter 1001
Places list 1001 on interface serial 0 as an input SAPCommand
filter.Print server advertisements from servers C and D will not be entered into the SAP table. All other SAP services from any source will be added into the SAP table.
54) Monitor and verify selected access list operations on the router.
Monitoring IPX Access Lists
London#sho ipx int e1/1
Ethernet1/1 is up, line protocol is up
IPX address is 10.0000.0c0d.724f, NOVELL-ETHER [up]
Delay of this IPX network, in ticks is 1 throughput 0 link delay 0
IPXWAN processing not enabled on this interface.
IPX SAP updates interval is 1 minute(s)
IPX type 20 propagation packet forwarding is disabled
Incoming access list is not set London#sh access-lists
Outgoing access list is not set IPX access list 800
IPX helper access list is not set deny 8000
SAP GNS processing enabled, delay 0 ms, output filter list is
SAP Input filter is not set
SAP Output filter is not set
SAP Router filter list is not set
Input filter list is 800
Output filter list is 801
Router filter list is not set
Netbios Input host access list is not set
Netbios Input bytes access list is not set
Netbios Output host access list is not set
Netbios Output bytes access list is not set
Updates each 60 seconds, aging multiples RIP: 3 SAP: 3
SAP interpacket delay is 55 ms, maximum size is 480 bytes
RIP interpacket delay is 55 ms, maximum size is 432 bytes
IPX accounting is disabled
IPX fast switching is configured (enabled)
RIP packets received 28460, RIP packets sent 24999
SAP packets received 4, SAP packets sent 2
The show ipx interface command displays information about the configuration of the interface. It shows that the input filter is 800 and the output filter list is 801. The show access-lists command displays the contents of lists 800 and 801.
55) Describe network congestion problem in Ethernet networks.
Recent years have seen the rise of client/server architecture. Technology advancements are producing faster, more intelligent desktop computers and workstations. Audio and video now accompany data on the network. The combination of powerful computer resources and a new generation of network-intensive applications has created the need for bandwidth in excess of traditional Ethernet’s shared 10 Mbps.
Increase in the transmission of graphics files, images, full-motion video, and multimedia applications make the task of managing today’s networks increasingly challenging. Also, the changes in the use of networks, particularly the Internet, increase network utilisation. As the number of users in a network increases, more users must share Ethernet’s fixed 10 Mbps bandwidth.
The increased utilisation causes an increase in network congestion even as more users try to access the same network resources. Response times become slow or variable, file transfers take longer, and network users become less productive. Congestion generates the demand for more LAN bandwidth.
When analysing network performance, you must keep in mind that certain network problems such as a slow server processor, insufficient I/O disk-space, or insufficient RAM memory cannot be solved by increasing the bandwidth of the network.
56) Describe the benefits of network segmentation with bridges.
The use of a bridge to segment an Ethernet LAN effectively provides more bandwidth per user because it results in fewer users per segment. A form of self-filtering is performed since packets with the destination and source address on the same segment are not forwarded. Bridges perform segmentation by building address tables that associate segment end stations with the segments port connection. Bridges (unlike routers), the protocol independent and transparent to the end stations in the network. Network installation of a bridge is a simple task because it "learns" its connected network topology.
A packet transmitted on the attached segment is received by the bridge containing everything form the destination address to the frame check sequence (FCS). Bridges use the source address to build a table of device addresses attached to a port.
The destination address is used to make a forwarding decision. If the destination address is on the same segment as the source station, the packet is not forwarded. If the destination address is associated with another port on the bridge, the packet is forwarded on that port. If the destination address is unknown, the packet is forwarded on all ports except the receiving port.
Bridges introduce a latency penalty due to processing overhead (20-30 percent in loss of throughput for acknowledgement-oriented protocols, and 10-20 percent for sliding windows protocols). This delay can increase significantly if the segment for which the packet is destined has a current activity.
Bridges forward multicast and broadcast packets to other attached segments. This characteristic may actually diminish the bandwidth gains realised as a result of segmentation. Multicast and broadcast addresses are never used as a source address, hence they never appear in the address tables associated with the bridge ports. "Broadcast storms" can result as these packets propagate throughout the network.
Filters to restrict propagation of multicast packets can effectively isolate them to the originating segment, but filter processing by the bridge can reduce throughput. This phenomenon can also affect LAN switches.
57) Describe the benefits of network segmentation with routers.
Routers operate at a higher level in the network architecture than do bridges. A router operates at the network layer and is used to extend a network across multiple data links, finding routes between the source and destination stations on an internetwork. Routers typically perform functions associated with bridging, such as making forwarding decisions based on table look-up. Unlike a bridge, the router is known to the stations using its services, and a well-defined protocol must be used among the stations and the router.
Routers offer the following advantages in a network:
To provide the above advantages, routers must be more complex and more software intensive than bridges. Routers provide a lower level of performance in terms of the numbers of packets that can be processed per unit. Compared with a bridge, routers must examine the syntax and interpret the semantics of more fields in a packet. The penalty for this added functionality is a 30-40 percent loss of throughput for acknowledgement-oriented protocols, and 20-30 for sliding window protocols.
58) Describe the benefits of network segmentation with switches.
A switched Ethernet connection operates like a network with only two nodes. In a switched Ethernet, the utilisation can reach closer to the 100 percent rate.
LAN switching is relatively new technology for LAN segmentation. A LAN switch is specifically designed to address LAN performance problems such as bandwidth shortages and network bottlenecks. A switch segments a LAN collision domain into smaller collision domains thus reducing or eliminating station contention for media access. A LAN switch is high-speed multi-port bridge with built in intelligence.
Switched Ethernet is based on standard Ethernet that provides dedicated Ethernet connection (10 Mbps per node) to each node directly connected to one of its switched ports. If an Ethernet switched port is connected to a hub, all the devices connected to that hub will share the 10 Mbps of bandwidth.
LAN switches use the data-link layer information to create a direct a point-to-point path across the switch or across several switches between the source and destination. Use of the MAC layer information for transmitting packets enables a LAN switch to be protocol enables a LAN switch to be protocol-independent.
The term switching has been applied to several network concepts as follows:
Switching is defined as the ability to forward packets on-the-fly through a cross-point matrix, a high-speed bus, or shared memory arrangement. As a packet enters the switch, either the source and destination addresses or just the destination address is examined. This examination determines the switching action to be taken for the packet. Since the address fields are only fields examined, there is minimal delay, and the packet is switched to the destination address segment (port) before it is received in its entirety.
LAN switching significantly improves network performance without impacting the addressing structure within the network.
59) Describe the features and benefits of Fast Ethernet.
In 1995, the IEEE approved the 802.3u Fast Ethernet standard. The IEEE 802.3 standard defines the specifications for the data link layer and the physical layer. Fast Ethernet technology is based on the Ethernet’s CSMA/CD protocol but is ten times faster than Ethernet. Compared to a 10-Mbps Ethernet system, the 100-Mbps Ethernet system takes one tenth of the amount of time it takes to transmit a bit on the Ethernet channel. This results in a tenfold increase in the speed of the packets over the Ethernet media.
In an Ethernet network, a station must transmit its packet before another packet is transmitted by another station. The slot-time, the time it takes to transmit 512 bits travelling at a speed of 10 Mbps, is the window within which a station must transmit and listen for a collision. The slot-time 5.12 microseconds ensures the transmitting station will receive a collision notification before the end of the slot-time.
The 100BaseT networks use the same slot-time as the Ethernet standard. To accommodate this, the network distance (span) between 100BaseT end nodes must be reduced. Also, the standard allows the use of two Class II repeaters in a 100BaseT segment.
However, the frame format, the amount of data transmitted in a frame, and the media access control mechanism in the Fast Ethernet standard remain the same as in standard Ethernet. Additionally, the Fast Ethernet specifications include mechanisms auto-negotiation of the media speed. This allows the use of dual-speed Ethernet interfaces that can be run at either 10 Mbps or 100 Mbps automatically.
100Base T Specifications
Fast Ethernet is well suited for bursty communication such as client/server applications, centralised server farms or power workgroups, and backbone implementations.
Media-independent Interface (MII)
The Media-independent interface (MII) specifies the MAC-layer connectivity to 100BaseT. This is similar in concept to the attachment unit interface (AUI). The MII defines a generic 100BaseT interface that can connect a transceiver to enable you to connect to any of the following three 100BaseT (Fast Ethernet) specifications:
100BaseTX
The 100BaseTX specification uses a two-pair Category 5 unshielded twisted pair (UTP), two-pair 100 ohm shielded twisted pair (STP), or Type 1 STP cable. 100BaseTX uses a Category 5 certified RJ-45 connector and the same pinout used in 10BaseT (transmit on 1 and 2, receive on 3 and 6). 100BaseTX supports full-duplex connection for switches, network interface cards (NICs), and routers.
100BaseFX
The 100BaseFX specification uses a two-strand, 50/125 or 62.55/125-micron multimode fibre optic cable of which one strand is used to transmit and the other and the other to receive. 100BaseFX uses an SC connector, straight-tip (ST) connector, or media independent connector (MIC). Similar to 100BaseTX, 100BaseFX supports full-duplex connection for switches, NICs, and routers.
100BaseX
The IEEE decided to use the term 100BaseX to refer to either the 100BaseTX (twisted pair) or the 100BaseFX (fibre optics) medium. The 100BaseX standard was approved to mate 100 Mbps Ethernet (CSMA/CD) media access control layer (MAC) with the ANSI X39.5 Physical Medium Dependent (PMD) specification. Because of this shared FDDI PMD sublayer, both 100BaseTX and 100BaseFX share the same signalling system.
100BaseT4
The 100BaseT4 specification uses four-pair Category 3, 4, or 5 UTP cable. 100BaseT4 uses a standard RJ-45 connector with the same pinout as the 10BaseT specification, plus two bi-directional pairs (transmit on 1 and 2, receive on 3 and 6; bi-directional on 4 and 5; bi-directional on 7 and 8).
All three-cable categories are based upon the IEEE 802.3u specification. However, 100BaseT4 allows the use of voice-grade four-pair twisted wires to support Fast Ethernet networks.
Advantages of Using 100BaseT Fast Ethernet
Consider the following benefits of Fast ethernet when evaluating suitable network technologies that you could use to improve the performance of a network and reduce network congestion.
100BaseT Repeaters
Similar to the standard Ethernet technology, Fast Ethernet technology can be used by Ethernet repeaters (shared segment) and switches (dedicated segments). In addition, the 100BaseT specification defines two kinds of repeaters, Class I and Class II, based on a repeater’s propagation delay.
The repeater delay value for a Class I repeater is 140 bit times whereas the allowable delay value for a Class II repeater is only 92 bit times.
The Class I repeater is known as a translational repeater. The Class II repeater is known as a transparent repeater. A Class I repeater can support both kinds of physical signalling (100BaseX and 100BaseT4).
The Class II repeater has a shorter propagation delay and offer more flexibility in the design of a collision domain. However, the Class II repeaters support only one physical signalling system, such as the 100BaseX or 100BaseT4. The repeater bit times available are not sufficient to support both signalling schemes.
60) Describe the guidelines and distance limitations of Fast Ethernet.
100BaseT Configuration Guidelines
There are certain rules that must be followed when working with 100BaseT networks. The rules specify the maximum transmission path length between two 100BaseT data terminal equipment (DTE) devices. A DTE is an end station, bridge, switch, router, or similar equipment at the end of a link. A Fast Ethernet repeater cannot be a DTE device.
Table 1 shows the 100BaseT media specifications for a DTE-to-DTE connection.
Table 1 - 100BaseT Cable and Connector Types
Port Type
Medium (Cable) Type Connector Type Distance100BaseT 100BaseTX (Category 5 UTP) RJ-45 100 metres
100BaseT 100BaseFX (50/125 or 62.5/125 SC/ST/MIC 412 metre (half-duplex)
multimode fibre) 2 kilometres (full-duplex)
The second rule specifies the maximum transmission path between two devices with a repeater in between. Table 2 shows the maximum distance between end nodes if there is a repeater in the path between them.
Table 2 – Maximum Distances between End Nodes
Number and Class of UTP and Fibre
Standard or Repeater Type Repeaters UTP Medium Media1
IEEE 802.3u 100BaseT 1 Class I repeater 200 metres 261 metres
1 Class II repeater 200 metres 308 metres
2 Class II repeaters 205 metres 216 metres
61) Distinguish between cut-through, store-and-forward and fragmentfree LAN switching.
Switching Modes
The latency for packet forwarding through the switch depends on the choice of switching modes. The faster modes trade off error checking for low forwarding latency. Switch throughput is not affected by the choice of switching modes; it is always at wire speed.
There are three operational modes to handle packet (frame) switching:
Store-and-forward – In the store-and-forward mode, the complete packet is received by the switch before forwarding takes place. The destination and source addresses are read, relevant filters are applied, and the packet is forwarded. Latency increases in proportion to packet size when this switching technique is used.
Cut-through (real-time switching) – In the cut-through mode, the switch does not wait for the packet to be completely received. It waits only for the header to be received in order to check the destination address. Depending on the network transport protocol being used (connectionless or connection-oriented), there is a significant decrease in latency from input port to output port. The delay in cut-through switching remains constant regardless of packet size because this switching mode starts to forward the packet as soon as the switch reads the source and destination addresses (some switches read only the destination address).
FragmentFree – A modified form of cut-through switching. In the FragmentFree switching mode, the switch waits for the collision window (64 bytes) to pass before forwarding. If a packet has an error, it almost always occurs within the first 64 bytes. FragmentFree mode provides better error checking than the Cut-through mode with practically no increase in latency.
62) Describe the operation of the Spanning Tree Protocol and its benefits.
Ethernet bridges and switches implement the IEEE 802.1d Spanning Tree Protocol (STP) specification to prevent loops in a network.
A network often provides more than for a packet to go from source node to a destination node. Existence of redundant paths in a network gives rise to a routing problem. A switch can see a packet originating from a host on two different ports – implying a topology loop in the network. Indeterminate forwarding behaviour can than result. To prevent this, the Spanning Tree Protocol is executed between the switches to detect to detect and logically remove redundant paths from the network.
A spanning tree protocol essentially establishes a root node and constructs a network topology such that there is exactly one path for reaching any node. Network devices exchange messages with each other to detect loops and then remove the loops by shutting down selected interfaces. The protocol also ensures that in case of a failure of an intermediate node, the redundant paths are utilised to construct a new tree that circumvents the failed node and maintains connectivity with nodes that lie downstream from it.
63) Describe the benefits of virtual LANs.
Through a switch us designed to segment a LAN into individual collision domains, the collision domains still belong to the same broadcast domain. The broadcast traffic from a collision domain is forwarded to all collision domains in the allowing devices within the broadcast domain to communicate with one another.
Virtual local area network (VLAN) is a logical grouping of network devices (users) connected to the port(s) on a LAN switch. A VLAN creates a single broadcast domain and is treated like a subnet. Unlike a traditional segment or workgroup, you can create a VLAN to group users by their work functions, departments, the applications used, or protocols shared irrespective of the users’ work location. A workgroup is a group of endusers who share certain computing resources.
VLAN implementation is most often done in the switch software. As the implementation of the VLAN technology is not yet standardised, switch vendors presently use their own proprietary standards for supporting VLANs.
Miscellaneous
Is the Link Operational?
The interface has two pieces: physical (hardware) and logical (software).
When you test the physical and data link, you ask two questions:
Interpreting show interface serial
Router# show int s 1
Serial1 is up, line protocol is up
Hardware is cxBus Serial
Description: 56Kb Line San Jose – MP
:: :: :: :: :: :: :: :: :: ::
Carrier Detect Keepalives
Operational …………………. Serial is up, line protocol is up
Connection Problem ……… Serial is up, line protocol is down
Interface Problem …………. Serial is down, line protocol is down
Disabled …………………….. Serial is administratively down, line protocol is down
One of the most important elements of the show interface serial command output is display of the line and data-link protocol status. The graphic indicates the key summary line to check and the status meanings.
The line status in this example is triggered by a Carrier Detect signal, and refers to the physical-layer facility.
However, the line protocol, triggered by keepalives frames, refer to the data-link framing.
ISDN Configuration Tasks
Selecting the ISDN Switch Type
Router (config) # isdn switch-type switch-type
Use the isdn switch-type global command to specify the CO switch to which the router connects. For BRI ISDN service, the switch type can be one of the following:
Switch Type Description
basic-5ess AT&T basic rate switches (USA)
basic-dms100 NT DMS-100 (North America)
basic-ni1 National ISDN-1 (North America)
basic-1tr6 German 1TR6 ISDN switches
basic-nwnet3 Norwegian Net3 switches
basic-nznet3 New Zealand Net3 switches
basic-ts013 Australian TS013 switches
basic-net3 Switch type for NET3 in United Kingdom and Europe
nnt NTT ISDN switch (Japan)
nn3 French VN3 ISDN switches
none No specific switch specified
Specifying Traffic to Trigger Call
Router (config) # dialer-list dialer-group protocol protocol-name [ permit | deny ]
Router (config) # dialer-group group-number
Router (config) # dialer map protocol next-hop-address [ name hostname ] [speed
56|64 ] [ broadcast ] [dialer string dial-string ]
These commands are used to configure dial-on-demand calls that will initiate a connection.
Selecting Interface Specifications
Router (config) # interface bri interface-number
Router (config) # encapsulation [ ppp | hdlc ]
The interface bri interface-number command designates the interface used for ISDN on a router acting as a TE1
If the router does not have a native BRI (is a TE2 device), it must use an external ISDN terminal adapter. On the TE2 router, use the command interface serial interface-number.
Use the encapsulation ppp command if you want PPP encapsulation for your ISDN interface. This is the case if you want any of the rich LCP options that PPP offers (for example, CHAP authentication). You must use PPP PAP or CHAP if you will receive calls from more than one dial-up source.
To revert from PPP encapsulation to the default, use the encapsulation hdlc command.
Configuring for a Simple ISDN Call
DDR is configured to connect Cisco A to Cisco B. The network between the serial interfaces of the two routers uses 8 bits of subnetting. Static route statements define the IP route to the Cisco B LAN interfaces over 172.16.126.0
IP packets will initiate a call, but not IGRP routing updates. Interesting traffic to DDR must be defined in an access list.
The number dialled is for the remote ISDN device. This number is provided by the Regional Bell Operating Company (RBOC) offering the ISDN service. Cisco B (the next-hop router to the destination networks) has subnets 126 and 29 directly connected.
BRI Simple Configuration Example
! set up switch type, static route and dialer for ISDN on Cisco A
isdn switch-type basic-5ess
ip route 172.16.29.0 255.255.255.0 172.16.126.2
dialer-list 1 protocol ip permit
!
! configure BRI interface for PPP; set address and mask
interface bri 0
encapsulation ppp
ip address 172.16.126.1 255.255.255.0
!
! refer to protocols in dialer-list to identify interesting packets dialer-group 1
!
! select call start, stop, and other ISDN provider details
dialer wait-for-carrier-time 15
dialer idle-timeout 300
isdn spid1 0145678912
! call setup details for router
dialer map ip 172.16.126.2 name cisco-b 445
In the example:
Command Description
isdn switch-type Selects the AT&T switch as the CO ISDN switch on this interface.
dialer-list 1 protocol ip permit Associates permitted IP traffic with the dialer group 1. The router will not start an ISDN call for any other packet traffic with dialer group 1.
interface bri 0 Selects the interface with TA and other ISDN functions on the router.
encapsulation ppp Use PPP encapsulation on the selected interface.
dialer-group 1 Associates the serial 0 interface with dialling access group 1.
dialer wait-for-carrier-time Specifies a 15 –second maximum time for the provider to respond once the call initiates.
dialer idle-timeout 300 Number of seconds of idle time before the router drops the ISDN call. Note that a long duration is configured to delay termination.
dialer map command Description
ip Name of protocol.
name An identification for the remote side router. Refers to called router.
445 ISDN connection number used to reach this DDR destination.
Kempson#
sho flashSystem flash directory:
File Length Name/status
1 2527380 c4500-in-11.1.bin
[2527444 bytes used, 1666860 available, 4194304 total]
4096K bytes of processor board System flash (Read/Write)
Kempson#sho version
Cisco Internetwork Operating System Software
IOS (tm) 4500 Software (C4500-IN-M), Version 11.1(9), RELEASE SOFTWARE (fc1)
Copyright (c) 1986-1997 by cisco Systems, Inc.
Compiled Mon 27-Jan-97 16:30 by dschwart
Image text-base: 0x600088A0, data-base: 0x604B0000
ROM: System Bootstrap, Version 5.1(1) [daveu 1], RELEASE SOFTWARE (fc1)
ROM: 4500-XBOOT Bootstrap Software, Version 10.1(1), RELEASE SOFTWARE (fc1)
Kempson uptime is 2 days, 3 hours, 27 minutes
System restarted by reload
System image file is "c4500-in-11.1.bin", booted via flash
cisco 4500 (R4K) processor (revision 0x00) with 32768K/4096K bytes of memory.
Processor board ID 01303061
R4600 processor, Implementation 32, Revision 1.0
G.703/E1 software, Version 1.0.
Bridging software.
X.25 software, Version 2.0, NET2, BFE and GOSIP compliant.
2 Ethernet/IEEE 802.3 interfaces.
2 FastEthernet/IEEE 802.3 interfaces.
128K bytes of non-volatile configuration memory.
4096K bytes of processor board System flash (Read/Write)
4096K bytes of processor board Boot flash (Read/Write)
Configuration register is 0x2102
Kempson#
sho protocolsGlobal values:
Internet Protocol routing is enabled
Novell routing is enabled
Ethernet0 is up, line protocol is up
Internet address is 130.4.1.1/16
Novell address is 1075D4A.0000.0c0c.3344
Ethernet1 is up, line protocol is up
Internet address is 130.8.1.1/16
Novell address is 1075D4C.0000.0c0c.3347
FastEthernet0 is up, line protocol is up
Internet address is 130.3.1.2/16
Novell address is 1075D4B.0000.0c0c.3345
FastEthernet1 is up, line protocol is up
Internet address is 130.1.100.5/16
Novell address is 1075D41.0000.0c0c.3346
Kempson#sho ip route
Codes: C - connected, S - static, I - IGRP, R - RIP, M - mobile, B - BGP
D - EIGRP, EX - EIGRP external, O - OSPF, IA - OSPF inter area
E1 - OSPF external type 1, E2 - OSPF external type 2, E - EGP
i - IS-IS, L1 - IS-IS level-1, L2 - IS-IS level-2, * - candidate default
U - per-user static route
Gateway of last resort is 130.3.1.1 to network 0.0.0.0
R 130.2.0.0/16 [120/1] via 130.1.1.2, 00:00:05, FastEthernet1
C 130.3.0.0/16 is directly connected, FastEthernet0
C 130.1.0.0/16 is directly connected, FastEthernet1
D EX 130.6.0.0/16 [170/858368] via 130.3.1.1, 14:52:16, FastEthernet0
D EX 130.7.0.0/16 [170/860928] via 130.3.1.1, 14:52:17, FastEthernet0
C 130.4.0.0/16 is directly connected, Ethernet0
C 130.8.0.0/16 is directly connected, Ethernet1
D EX 130.9.0.0/16 [170/858368] via 130.3.1.1, 14:52:16, FastEthernet0
D EX 130.17.0.0/16 [170/858368] via 130.3.1.1, 14:52:16, FastEthernet0
D 130.22.0.0/16 [90/30720] via 130.3.1.1, 14:52:16, FastEthernet0
D 130.23.0.0/16 [90/30720] via 130.3.1.1, 2d02h, FastEthernet0
D EX 130.20.0.0/16 [170/860928] via 130.3.1.1, 14:52:16, FastEthernet0
D*EX 0.0.0.0/0 [170/30720] via 130.3.1.1, 14:52:16, FastEthernet0
D EX 130.0.0.0/8 [170/30720] via 130.3.1.1, 14:52:16, FastEthernet0
Kempson#sho ip protocol
Routing Protocol is "eigrp 10"
Outgoing update filter list for all interfaces is not set
Incoming update filter list for all interfaces is not set
Default networks flagged in outgoing updates
Default networks accepted from incoming updates
EIGRP metric weight K1=1, K2=0, K3=1, K4=0, K5=0
EIGRP maximum hopcount 100
EIGRP maximum metric variance 1
Redistributing: eigrp 10, rip
Automatic network summarization is in effect
Automatic address summarization:
130.3.0.0/16 for Ethernet0, Ethernet1
130.4.0.0/16 for FastEthernet0, Ethernet1
130.8.0.0/16 for Ethernet0, FastEthernet0
Routing for Networks:
130.3.0.0
130.4.0.0
130.8.0.0
Routing Information Sources:
Gateway Distance Last Update
130.3.1.1 90 14:53:17
130.4.1.2 90 14:53:17
130.8.1.2 90 14:53:17
Distance: internal 90 external 170
Routing Protocol is "rip"
Sending updates every 30 seconds, next due in 9 seconds
Invalid after 180 seconds, hold down 180, flushed after 240
Outgoing update filter list for all interfaces is not set
Incoming update filter list for all interfaces is not set
Redistributing: eigrp 10, rip
Default version control: send version 1, receive any version
Interface Send Recv Key-chain
FastEthernet1 1 1 2
Routing for Networks:
130.1.0.0
Routing Information Sources:
Gateway Distance Last Update
130.1.1.2 120 00:00:10
Kempson#sho cdp neigh
Capability Codes: R - Router, T - Trans Bridge, B - Source Route Bridge
S - Switch, H - Host, I - IGMP, r - Repeater
Device ID Local Intrfce Holdtme Capability Platform Port ID
Camomile Eth 0 152 R 4500 Eth 1
Staple Eth 1 169 R 3640 Eth 1/0
Stone Fas 0 154 R 7206 Fas 4/0
Kempson#sho cdp neigh det
-------------------------
Device ID: Camomile
Entry address(es):
IP address: 130.4.1.2
Novell address: 1075D4A.0000.0c0c.33f1
Platform: cisco 4500, Capabilities: Router
Interface: Ethernet0, Port ID (outgoing port): Ethernet1
Holdtime : 124 sec
Version :
Cisco Internetwork Operating System Software
IOS (tm) 4500 Software (C4500-IN-M), Version 11.1(9), RELEASE SOFTWARE (fc1)
Copyright (c) 1986-1997 by cisco Systems, Inc.
Compiled Mon 27-Jan-97 16:30 by dschwart
-------------------------
Device ID: Staple
Entry address(es):
IP address: 130.8.1.2
Novell address: 1075D4C.00e0.1e94.73b0
Platform: cisco 3640, Capabilities: Router
Interface: Ethernet1, Port ID (outgoing port): Ethernet1/0
Holdtime : 140 sec
Version :
Cisco Internetwork Operating System Software
IOS (tm) 3600 Software (C3640-D-M), Version 11.2(10a)P, RELEASE SOFTWARE (fc1)
Copyright (c) 1986-1997 by cisco Systems, Inc.
Compiled Wed 03-Dec-97 04:11 by ccai
-------------------------
Device ID: Stone
Entry address(es):
IP address: 130.3.1.1
Novell address: 1075D4B.0010.2fea.6420
Platform: cisco 7206, Capabilities: Router
Interface: FastEthernet0, Port ID (outgoing port): FastEthernet4/0
Holdtime : 167 sec
Version :
Cisco Internetwork Operating System Software
IOS (tm) 7200 Software (C7200-DS-M), Version 11.2(10a), RELEASE SOFTWARE (fc1)
Copyright (c) 1986-1997 by cisco Systems, Inc.
Compiled Tue 02-Dec-97 18:23 by ckralik